Building Shellporter: From Idea to Production in a Week
I work with multiple projects at the same time. My typical macOS setup is one Desktop/Workspace per project, with my IDE and a terminal window. I prefer using a standalone terminal over the one built into the IDE because TUIs, especially those from AI agents, tend to perform better there: no scrolling jank, no weird jumps, and a generally smoother experience. And also I prefer to have a full big window dedicated to the terminal with more stuff to read rather than a small window in the IDE.
But I’m lazy. Every time I switch to a different project, I need to open a new terminal window and navigate to the right path.
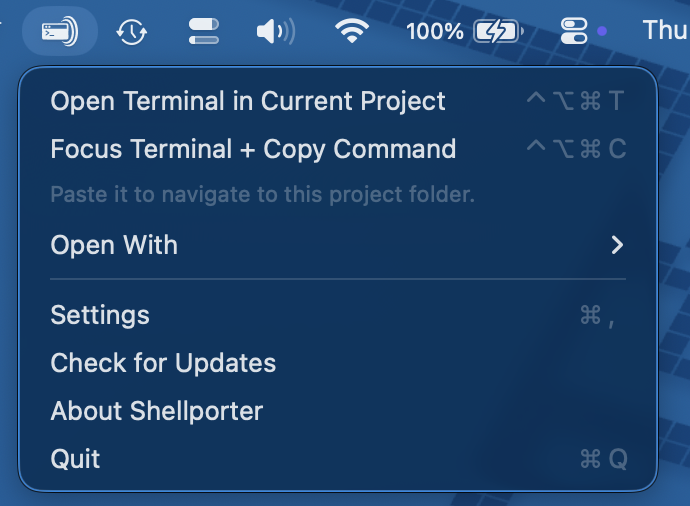
So my lazy-driven-development™ skills kicked in and Shellporter was born: a macOS menu bar utility that opens a terminal in the project directory of the active IDE window, with a single global hotkey press or by clicking a button in the menu bar.
How it works
When you press Ctrl+Opt+Cmd+T, Shellporter:
- Identifies the frontmost IDE and its window
- Reads the window title and document attributes via the macOS Accessibility API
- Runs a chain of resolution strategies tailored to each IDE family
- Opens the configured terminal at that directory
If everything fails, a manual folder picker shows up as a last resort.
It supports (at the time of writing of this article) JetBrains IDEs, Android Studio, VS Code, Cursor, Antigravity, and Xcode. On the terminal side: Kitty, Ghostty, Terminal.app, iTerm2, and a custom command option for anything else. This cover the current set of IDEs and terminals that I use daily, but if you need support for a different IDE or terminal, contributions are welcome. Feel free to open a PR or an issue.
Different IDEs expose project information in very different ways, so a “catch them all”™ approach doesn’t work. Shellporter uses a chain of resolution strategies: window title parsing, Accessibility API document attributes, IDE metadata files (recentProjects.xml for JetBrains, storage.json for VS Code) and the chain order changes depending on the IDE family, prioritizing the most reliable source for each one.
A resolution cache sits at the end of the chain as a fallback. The Accessibility API can return nil during app transitions, window switches, or full-screen animations, so the cache ensures that a previously resolved path is still available when the live strategies temporarily fail.
How it’s built
No Xcode
This project was the perfect occasion for experiment and trying different ways of working.
I’ve decided to go with a no Xcode approach, not only for writing code (something I’ve been doing already for a while for FeedFlow and ReaderFlow) but also for packaging and releasing.
The inspiration came from this post by Thomas Ricouard about Peter Steinberger’s CodexBar repo
I like how @steipete completely shortcut Xcode for building, packaging, and releasing macOS apps.
— Thomas Ricouard (@Dimillian) January 7, 2026
Next time I make a pure macOS app I'll take CodexBar repo as an example. Full of ready to use useful scripts. pic.twitter.com/NzVd1SMUQJ
I’ve pulled the skill that Thomas created from CodexBar, and started exploring how CodexBar is done. The end result is amazing: everything is handled by a bunch of scripts for running the app, packaging, releasing, etc, that an agent can easily pick.
Agentic development
Another experiment occasion was to fully use the new Codex app, since I’ve always used Claude Code and Codex from the CLI (easy guess given what I’m building here).
I’ve started with an empty folder, and I’ve started chatting with Codex (GPT-5.3-Codex High) telling what I wanted to build and how I wanted it (a SwiftPM-only macOS). Just a simple chat without any overcomplicated flows and multiagents preplanning etc. This is my usually way of working: keep it simple and “YOLO” it by talking with the agent.
After answering a bunch of questions and some discussion, I’ve asked to write down the implementation plan, just to have it written in case I want to change chat and the development started. The initial implementation was pretty good and it took me only a bunch of back and forth to refine the functionalities. Some of the follow-ups were to simplify the code and make it simpler because at the beginning it was a bit overengineered.
To review, refine and refactor I’ve decided to use Claude Code and Opus 4.6, just to have another pair of eyes. And this worked nicely: Claude Code found things that Codex didn’t and viceversa. I like using both.
From idea to production
I’m writing this announcement post on a Saturday morning and I’ve started the development on Monday evening. So the entire process from idea to production took less than a week which is quite astonishing.
As always, the blocker in this case is the publishing part. After 2 evenings I had the app working and I’ve started dogfooding it already with my workflow. I’ve spent the remaining 3 evenings to polish the code, prepare the release, documentations, announcements, websites, etc etc.
We’ve unlocked and sped up the development part, but we still need to speed up the publishing part. Even with publishing as the bottleneck, now it’s the best time to build and put your idea out.
Wrapping up
I built Shellporter for my specific workflow, but I decided to publish it because other folks might be in the same situation: going throught multiple projects with a standalone terminal and getting annoyed by the constant cd-ing around.
Shellporter is open source on GitHub. You can find more details and download it from the website or directly from the GitHub releases page. It requires macOS 14+ and the Accessibility permission.
The current set of supported IDEs and terminals covers what I use daily, but if you need support for a different IDE or terminal, contributions are welcome; feel free to open a PR or an issue. Same goes for suggestions or ideas: I’m open to feedback, so don’t hesitate to open an issue.