Accessing native macOS API in Compose Multiplatform
Compose Multiplatform is an amazing framework for building desktop applications that run on the JVM (Java Virtual Machine) on multiple platforms (macOS, Windows, and Linux).
However, things get trickier if platform-specific APIs, like iCloud on macOS, are needed. These APIs are tied to their native platforms and aren’t designed to be easily shared across multiple targets. Integrating such APIs into a Compose Multiplatform (in this article, when I mention Compose Multiplatform, I’m referring to Compose Multiplatform Desktop apps that run on the JVM) project requires some additional setup and “creativity”.
In this article, I’ll explain how to use native macOS API in a Compose Multiplatform desktop application. I will take a real-world example from my open-source RSS reader app FeedFlow, where I implemented data synchronization with iCloud. For the purpose of this article, I will showcase a simplified implementation of iCloud, just to understand the process; a more detailed tutorial about iCloud may arrive in the future.
The plan
Writing Kotlin to generate binaries that can be called from Kotlin. Weird and fascinating.
Accessing native macOS APIs from a JVM-based application requires creating a bridge between the Java environment and the native platform. This can be achieved by building a native dynamic library (.dylib) and accessing it from the Compose Multiplatform app through JNI (Java Native Interface; more information about JNI is available in the official documentation).
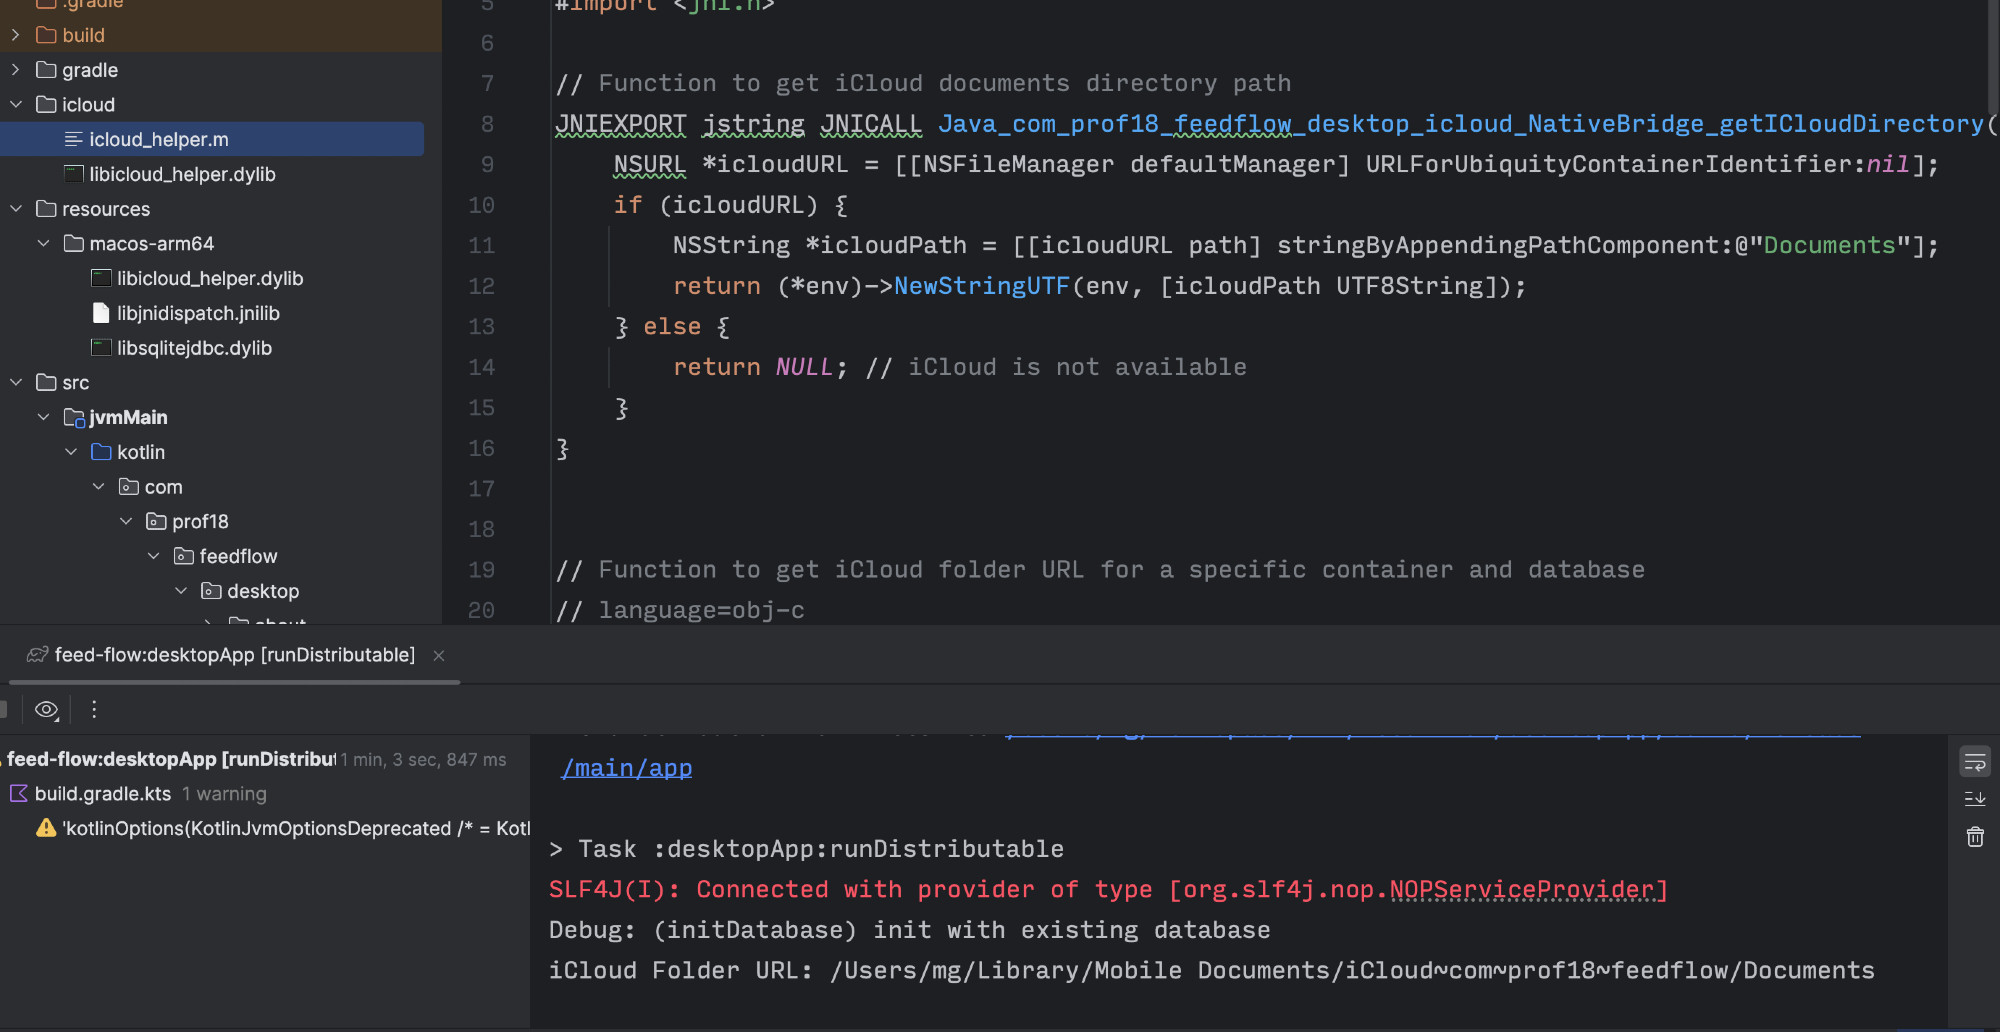
At first, I tried writing the dynamic library in Objective-C, and technically, it worked.
However, as Kevin Galligan pointed out, writing Objective-C code these days isn’t the most pleasant developer experience.
I'll throw out the obvious, potentially terrible idea. If you have a lot of ObjC code, write that in Kotlin/Native and export a minimal API you need to call from JNI (which could just be C instead of ObjC?). Not to complicate your thinking (I like to avoid writing ObjC)
— Kevin Galligan (@kpgalligan.bsky.social) 2024-12-03T22:19:46.589Z
Luckily, there’s a better solution: Kotlin/Native.
Kotlin/Native can target macOS directly and it provides Kotlin bindings for many native Apple frameworks, for example Foundation and UIKit. This makes it possible to interact with macOS APIs using Kotlin, without the need to write Objective-C. Then, these native functionalities can be exposed to the Compose Multiplatform app with a dynamic library.
The following sections will walk through the complete implementation process step-by-step.
Module creation
The first step is creating a dedicated Gradle module for the library. While the main application targets the JVM, this module will directly target macOS using Kotlin/Native.
In the build.gradle.kts file, it’s necessary to define the library’s name (in my case, a very thoughtful name: ikloud) and specify the macOS architecture to target. Since only Apple Silicon is required in my case, the target is set to macosArm64.
kotlin {
    macosArm64("ikloud") {
        binaries {
            sharedLib {
                baseName = "ikloud"
            }
        }
    }
}
Kotlin/Native comes with the ability to consume C and Objective-C libraries using a tool called cinterop, that generates Kotlin bindings so the library’s methods can be called in Kotlin. Built-in platform libraries like Foundation or UIKit, already have bindings available, while for others, such as JNI, a definition file must be provided to generate such bindings. More details can be found in the official documentation.
The definition file, with extension .def is usually named the same way as the library which bindings need to be generated, in this case jni.def. The file should be placed under src/nativeInterop/cinterop/ and it includes the header of the libray.
headers = jni.h
Gradle must then be configured to include the interop definition:
kotlin {
    macosArm64("ikloud") {
        binaries {
            sharedLib {
                baseName = "ikloud"
            }
        }

        compilations.getByName("main") {
            cinterops {
                val jni by creating {
                    packageName = "com.prof18.jni"

                    val javaHome = File(System.getProperty("java.home"))
                    includeDirs(
                        Callable { File(javaHome, "include") },
                        Callable { File(javaHome, "include/darwin") },
                    )
                }
            }
        }
    }
}
The packageName property defines the package where the generated Kotlin bindings will reside, in this case com.prof18.jni.
To complete the setup, the JNI headers files must be located. The headers are included with the JDK, and usually they can be found under the include and include/darwin directories:
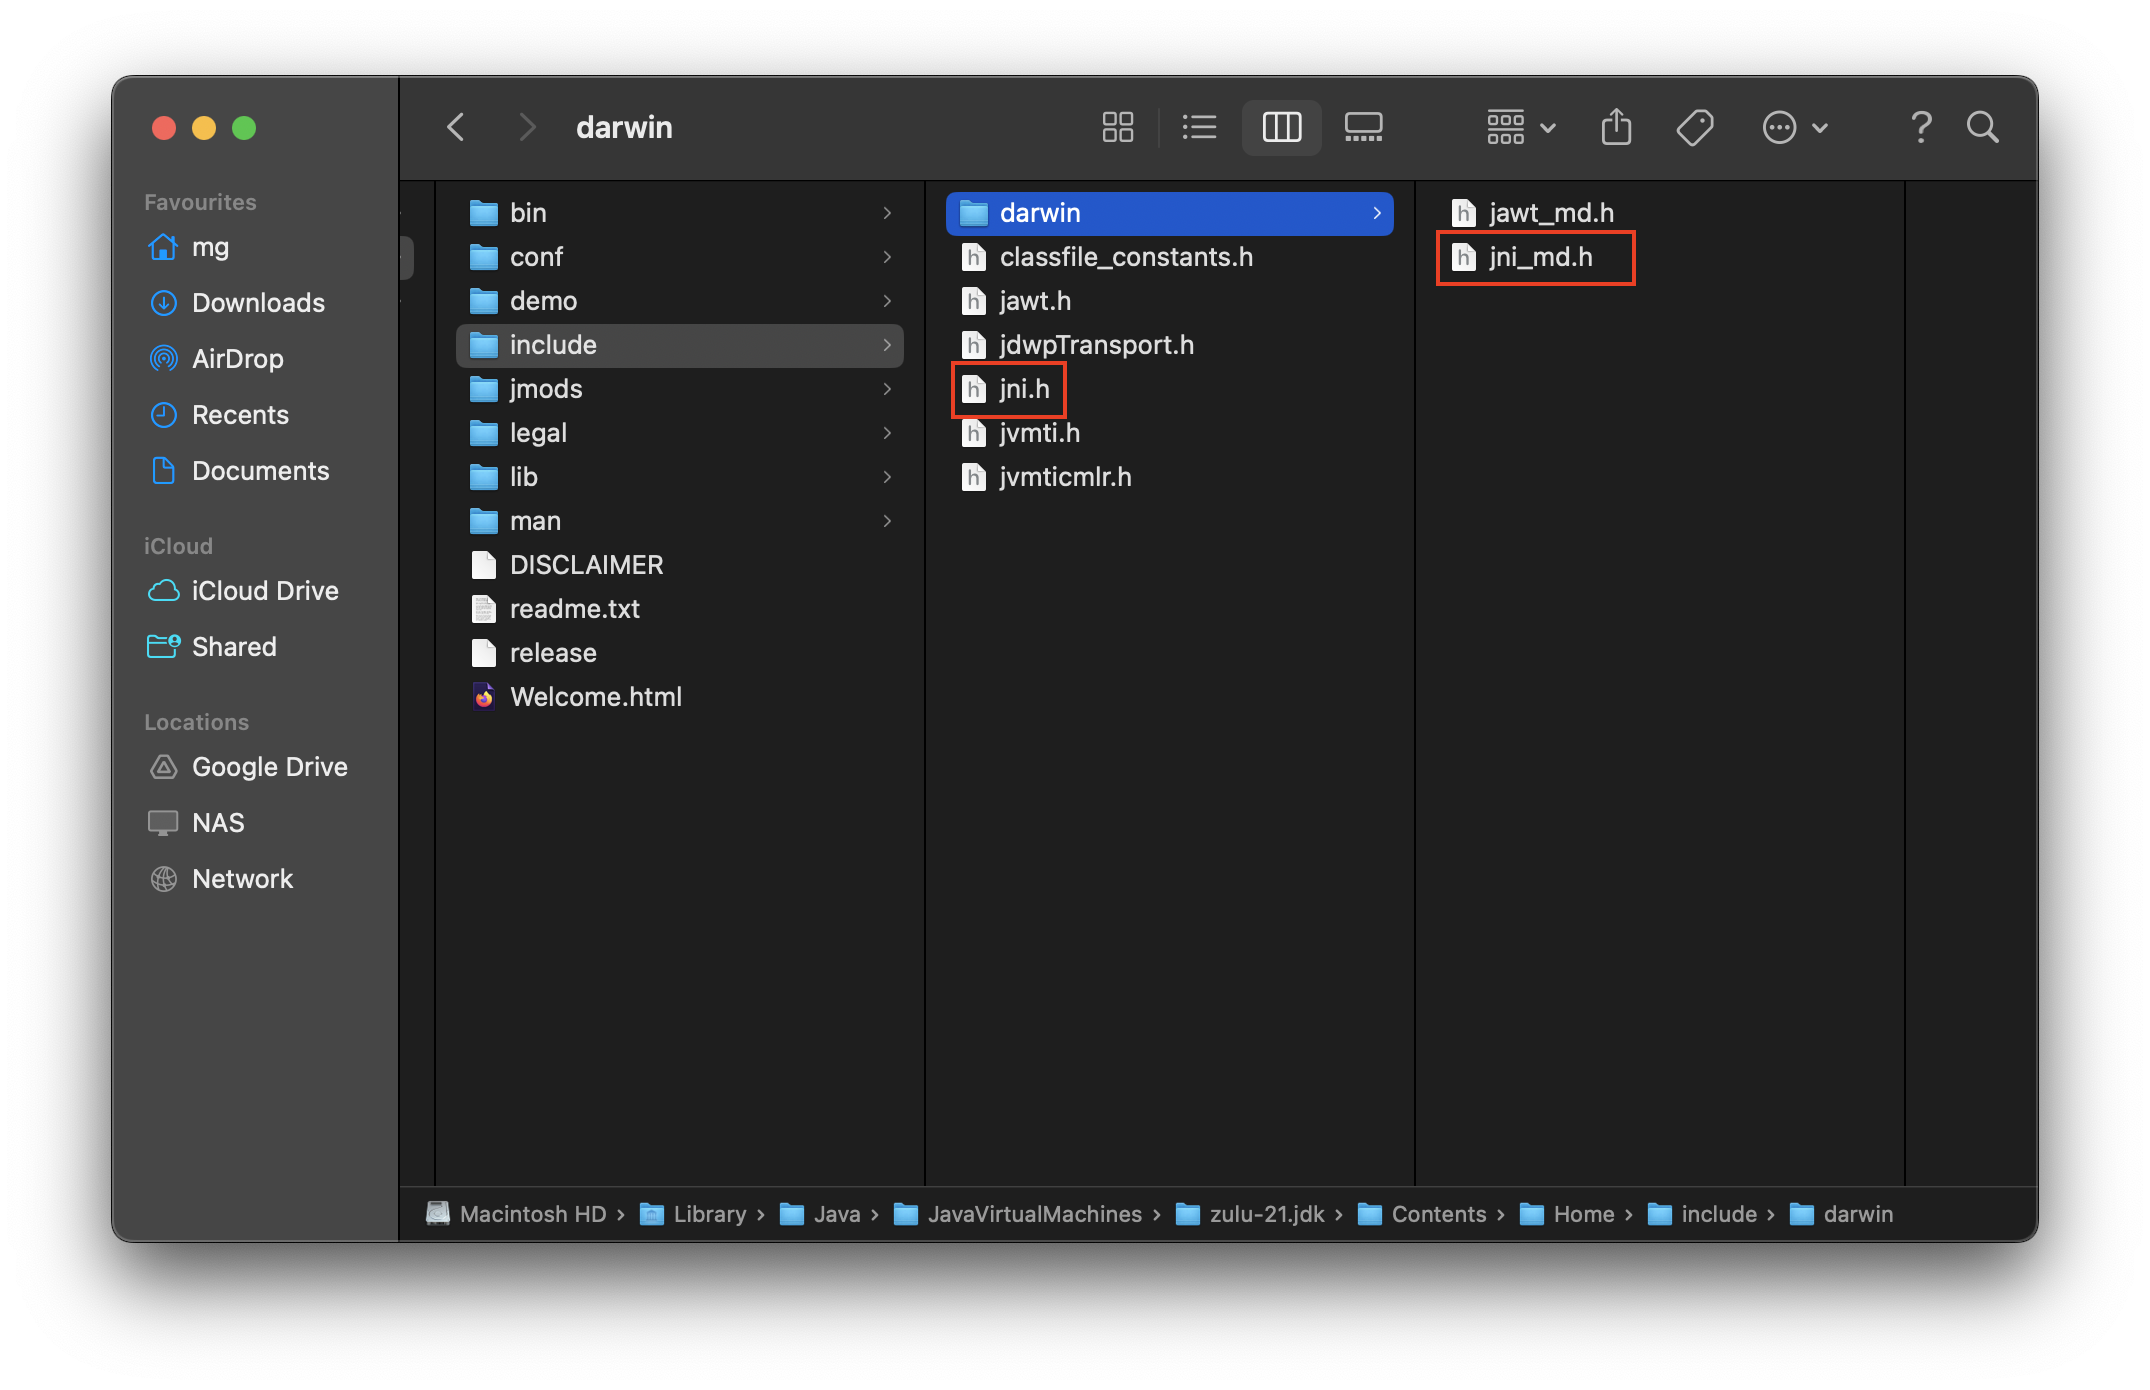
The includeDirs function sets those paths. The use of Callable ensures that the evaluation of the directory paths is deferred until needed, rather than during Gradle configuration phase. Although resolving javaHome early would likely be safe in this context, deferring the computation is a safer approach.
val javaHome = File(System.getProperty("java.home"))
includeDirs(
    Callable { File(javaHome, "include") },
    Callable { File(javaHome, "include/darwin") },
)
Library creation
With the Kotlin/Native module and JNI interop configured, the next step is implementing the native functionality, in this case downloading a file from iCloud into the local file system.
To make a native function callable from the JVM via JNI, its name must follow the JNI naming convention: Java_<package>_<class>_<method>
For example: Java_com_prof18_feedflow_desktop_feedsync_ICloudNativeBridge_iCloudDownload
Fortunately, Kotlin/Native provides the @CName annotation, which allows the exported symbol name to be customized. This means the Kotlin function can have a readable name while still satisfying JNI requirements:
@CName("Java_com_prof18_feedflow_desktop_feedsync_ICloudNativeBridge_iCloudDownload")
fun iCloudDownload(env: CPointer<JNIEnvVar>, clazz: jclass)
The function needs also match the expected JNI signature. In this case:
env: a pointer to the JNI environment (JNIEnvVar), used to interact with the JVM.clazz: a reference to the calling Java/Kotlin class (jclass), unused here, but required by the signature
No additional parameters are passed from the JVM or returned in this example, though the signature can be extended to accept other types such as jstring, jint, or jboolean, depending on the use case.
Within the function, native macOS APIs can be accessed as needed. In this case, a database file stored in FeedFlow’s iCloud container is copied into the app’s private documents directory:
@CName("Java_com_prof18_feedflow_desktop_feedsync_ICloudNativeBridge_iCloudDownload")
fun iCloudDownload(env: CPointer<JNIEnvVar>, clazz: jclass) {
    val iCloudURL = NSFileManager.defaultManager
        .URLForUbiquityContainerIdentifier("iCloud.com.prof18.feedflow")
        ?.URLByAppendingPathComponent("Documents")
        ?.URLByAppendingPathComponent("database.db")

    val documentsDirectory: NSURL? = NSFileManager.defaultManager.URLsForDirectory(
        directory = NSDocumentDirectory,
        inDomains = NSUserDomainMask,
    ).firstOrNull() as? NSURL?
    val destinationURL = documentsDirectory?.URLByAppendingPathComponent("database.db")

    if (destinationURL != null && iCloudURL != null) {
        NSFileManager.defaultManager.copyItemAtURL(
            srcURL = iCloudURL,
            toURL = destinationURL,
            // Handle error if needed, omitted for simplicity
            error = null,
        )
    }
}
At this point, the native function is implemented, named appropriately for JNI, and ready to be invoked from the JVM. The next step involves compiling and integrating the shared library into the Compose Multiplatform application.
Library compilation
Once the native Kotlin/Native code is implemented, it must be compiled into a dynamic library (.dylib) and made accessible to the main Compose Multiplatform app. The Gradle task for building the library is linkReleaseSharedIkloud, where Ikloud is the name given to the library in the Gradle setup done previously.
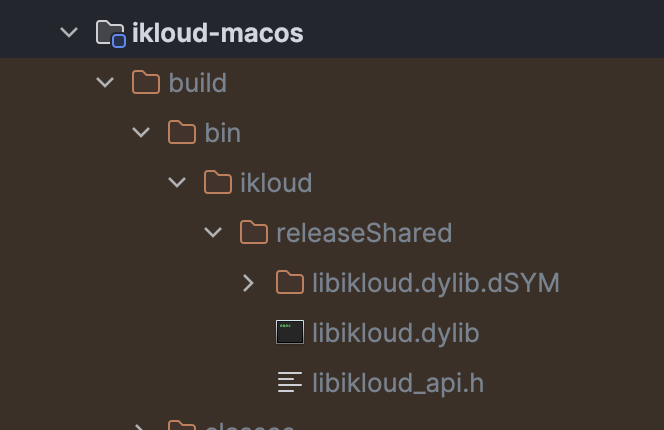
Rather than manually moving the compiled library after each build, I automated the process with a Gradle task that copies the .dylib file into the appropriate directory as soon as it’s built. This ensures it is bundled correctly with the final application package.
Library bundling
Compose Multiplatform supports including platform-specific resources in native distributions. As described in the official documentation, this can be done by setting the appResourcesRootDir property in the Gradle configuration:
compose.desktop {
    application {
        appResourcesRootDir.set(project.layout.projectDirectory.dir("resources"))
    }
}
The packaging process will include files that are placed in the following subdirectories of the resources/ folder:
- Common resources:
resources/common, included in all the targets. - OS-specific resources:
resources/macos,resources/windows, etc. - OS + architecture-specific resources:
resources/macos-arm64,resources/windows-x64, etc.
For example, placing a file in resources/macos-arm64 ensures it’s bundled only in Apple Silicon macOS builds.
By including native libraries through this mechanism, they are automatically signed as part of the release packaging process (for example, during macOS notarization and signing). Having the library signed is a necessary step to be able to execute the library at runtime.
Gradle Task
To automate the copy step, I created a simple custom Gradle task that copies the compiled .dylib file into the correct platform-specific resource directory:
abstract class BuildAndCopyIkloudMacos : DefaultTask() {

    @get:InputFile
    abstract val source: RegularFileProperty

    @get:OutputDirectory
    abstract val destination: DirectoryProperty

    @get:Inject
    abstract val fs: FileSystemOperations

    @TaskAction
    fun action() {
        fs.copy {
            from(source)
            into(destination)
        }
    }
}
This task is registered in the Gradle configuration and set to run after the Kotlin/Native build task completes:
tasks.register<BuildAndCopyIkloudMacos>("buildAndCopyIkloudMacOS") {
    dependsOn(":feedSync:ikloud-macos:linkReleaseSharedIkloud")

    val projectDir = rootProject.layout.projectDirectory
    source = layout.buildDirectory.file("bin/ikloud/releaseShared/libikloud.dylib")
    destination = projectDir.dir("desktopApp/resources/macos-arm64")
}
With this setup, the native library is automatically compiled and copied into the expected location, so no manual steps are required.
Library usage
After compiling and bundling the native .dylib file into the final application, the last step is to invoke the native function from the Compose Multiplatform desktop app.
A simple Kotlin class is used as a bridge between the JVM and the native code.
class ICloudNativeBridge {
    external fun iCloudDownload()
}
The external modifier instructs the Kotlin compiler that the method is implemented in native code, in this case within the macOS .dylib library. The method signature must match the function exposed by the native module using the @CName annotation. For example:
@CName("Java_com_prof18_feedflow_desktop_feedsync_ICloudNativeBridge_iCloudDownload")
fun iCloudDownload(env: CPointer<JNIEnvVar>, clazz: jclass)
To make the native method available at runtime, the .dylib file must be explicitly loaded into the JVM process using System.load():
if (System.getProperty("os.name").lowercase() == "mac") {
    val resourcesDir = System.getProperty("compose.application.resources.dir")
    val libraryPath = resourcesDir + File.separator + System.mapLibraryName("ikloud")

    try {
        System.load(libraryPath)
        ICloudNativeBridge().iCloudDownload()
    } catch (e: UnsatisfiedLinkError) {
        // Handle errors, e.g., log or alert user
    }
}
The System.mapLibraryName() function resolves the correct filename format for the platform (e.g., libikloud.dylib on macOS).
If the library is missing, improperly packaged, or fails to load due to issues like code signing, an UnsatisfiedLinkError exception will be thrown, so it’s recommended to handle the exception to avoid unexpected crashes.
Conclusions
Using Kotlin Native and JNI introduces some additional complexity and a bit of a learning curve in order to setup all the required infrastructure. Despite that, it’s still a worthwhile approach to gain access to native APIs that otherwise would not be accessible directly through the JVM.
The complete iCloud syncing implementation on FeedFlow, built using Kotlin/Native and JNI on macOS, is available in this pull request.
I’ve talked about this topic at droidcon Berlin. You can check out the recording of the talk on YouTube: