How to schedule jobs with Quartz on Ktor
SERIES: Building a backend with Ktor
- Part 1: Structuring a Ktor project
- Part 2: How to persist Ktor logs
- Part 3: How to use an in-memory database for testing on Ktor
- Part 4: How to handle database migrations with Liquibase on Ktor
- Part 5: Generate API documentation from Swagger on Ktor
- Part 6: How to schedule jobs with Quartz on Ktor
- Part 7: Moving from mobile to backend development with Ktor
Sometimes, on a backend project, there is the need to run one or more tasks periodically, like for system administration, maintenance, backup, syncing content in the background, etc. These types of tasks can be scheduled “manually” with a cron job or with a scheduling library like Quartz, that makes easy for example the persistence of the task’s state even after a reboot of the server.
In this article, I will show how to set up and use Quartz to schedule jobs on a Ktor project.
This post is part of a series of posts dedicated to Ktor where I cover all the topics that made me struggle during development and that was not easy to achieve out of the box. You can check out the other instances of the series in the index above or follow me on Twitter to keep up to date.
Setup
The first thing to do is to add the dependency in the build.gradle.kts file:
implementation("org.quartz-scheduler:quartz:<version-number>")
Quartz persists in the database the state of the jobs, to be able to restore them when the server is rebooted. To do that, it is necessary to create some tables in the database used by the backend project.
Quartz provides a bunch of SQL files that can be used to generate all the required tables. The file can be found inside the source code in the following path: quartz-core/src/main/resources/org/quartz/impl/jdbcjobstore (click here to open the folder on GitHub).
.
├── jdbcjobstore

    ...

    ├── tables_mysql.sql
    ├── tables_mysql_innodb.sql
    ├── tables_oracle.sql

    ...
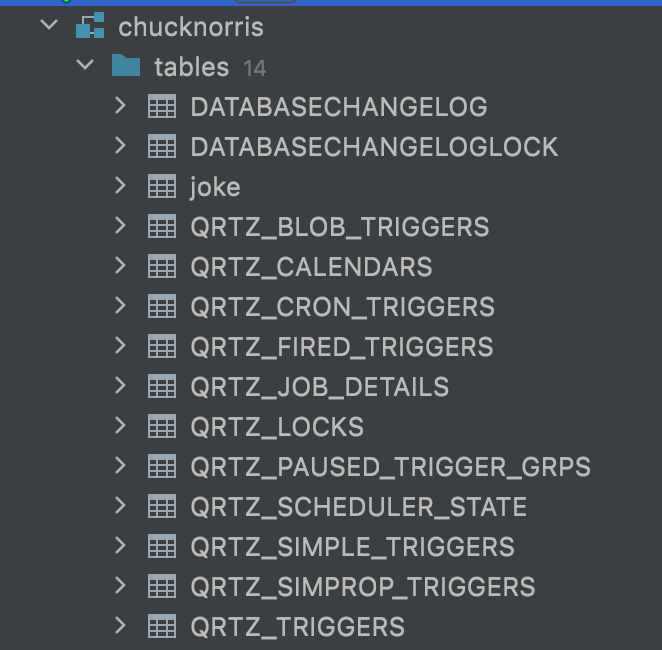
In this project, I’m using MySQL so the tables_mysql.sql file is required.
After running the SQL code, the following tables are created:
Before moving on, I suggest you do another thing. Since the logs that Quartz produces are very verbose, it is recommended to lower the logging level of the Quartz classes to INFO inside the logback.xml file.
<configuration>
    ...
    <logger name="org.quartz" level="INFO"/>
</configuration>
For more details about customizing the logging, I suggest you look at the second instance of the series.
Note: the Quartz library is huge. There are many different features, possibilities, and settings to choose from. In this article, I will show the “combination” that worked for me. If you are interested in more, I suggest you give a look at the documentation.
Create a Scheduler
The main entry point for adding, removing, and manipulating jobs is the Scheduler. A Scheduler can be created with a SchedulerFactory and has to be started with the start() method before interacting with it.
There are different implementations of the SchedulerFactory interface, and I’ve used the StdSchedulerFactory. You can find other implementations in the documentation.
The factory requires also some configurations parameters that are provided with Java Properties.
To handle the creation and the lifecycle of the Scheduler, I’ve created a wrapper class called JobSchedulerManager. The class is responsible for creating the SchedulerFactory, storing the Scheduler instance (that will be retrieved from who wants to schedule something), and starting the Scheduler.
class JobSchedulerManager(appConfig: AppConfig) {

    var scheduler: Scheduler

    init {
        val databaseConfig = appConfig.databaseConfig

        val props = Properties()
        props["org.quartz.scheduler.instanceName"] = "ChuckNorrisScheduler"
        props["org.quartz.threadPool.threadCount"] = "3"

        props["org.quartz.dataSource.mySql.driver"] = databaseConfig.driverClass
        props["org.quartz.dataSource.mySql.URL"] = databaseConfig.url
        props["org.quartz.dataSource.mySql.user"] = databaseConfig.user
        props["org.quartz.dataSource.mySql.password"] = databaseConfig.password
        props["org.quartz.dataSource.mySql.maxConnections"] = "10"

        props["org.quartz.jobStore.class"] = "org.quartz.impl.jdbcjobstore.JobStoreTX"
        props["org.quartz.jobStore.driverDelegateClass"] = "org.quartz.impl.jdbcjobstore.StdJDBCDelegate"
        props["org.quartz.jobStore.tablePrefix"] = "QRTZ_"
		props["org.quartz.jobStore.dataSource"] = "mySql"

		props["org.quartz.plugin.triggHistory.class"] = "org.quartz.plugins.history.LoggingTriggerHistoryPlugin"
        props["org.quartz.plugin.triggHistory.triggerFiredMessage"] = """Trigger {1}.{0} fired job {6}.{5} at: {4, date, HH:mm:ss MM/dd/yyyy}"""
        props["org.quartz.plugin.triggHistory.triggerCompleteMessage"] = """Trigger {1}.{0} completed firing job {6}.{5} at {4, date, HH:mm:ss MM/dd/yyyy}"""

        val schedulerFactory: SchedulerFactory = StdSchedulerFactory(props)
        scheduler = schedulerFactory.scheduler
    }

    fun startScheduler() {
        scheduler.start()
    }
}
The configuration parameters that I’ve provided are the following, but you can find more in the documentation:
org.quartz.scheduler.instanceName: the name of the Scheduler’s instance. It is used only to distinguish when multiple instances are used;org.quartz.threadPool.threadCount: the number of threads available for concurrent execution of the jobs;org.quartz.dataSource.mySql.driver: the Java class name of the JDBC driver;org.quartz.dataSource.mySql.URL: the connection URL for the database;org.quartz.dataSource.mySql.user: the database username;org.quartz.dataSource.mySql.password: the database password;org.quartz.dataSource.mySql.maxConnections: the maximum number of connections to the database that the DataSource can create;org.quartz.jobStore.class: the class used to store scheduling information in the database. I used theJobStoreTXthat manages all database’s transactions itself after every action (for example after adding a new job);org.quartz.jobStore.driverDelegateClass: a driver delegate to understand the dialect of the database system. Since I’m using a MySQL database with JDBC drivers, I’ve selected theStdJDBCDelegate;org.quartz.jobStore.tablePrefix: the prefix used in the Quartz tables name created before. By default the value isQRTZ_;org.quartz.jobStore.dataSource: the type of data source used, in this casemySql;org.quartz.plugin.triggHistory.class: the name of a plugin that catches trigger events to send a log. I’ve used theLoggingTriggerHistoryPlugin;org.quartz.plugin.triggHistory.triggerFiredMessage: a message to log when a new trigger is fired. I’ve set this message:Trigger {1}.{0} fired job {6}.{5} at: {4, date, HH:mm:ss MM/dd/yyyy}The numbers represents the following data:{0}: the Trigger’s Name;{1}: the Trigger’s Group;{2}: the scheduled fire time;{3}: the next scheduled fire time;{4}: the actual fire time;{5}: the Job’s name;{6}: the Job’s group;{7}: the re-fire count from the JobExecutionContext;
org.quartz.plugin.triggHistory.triggerCompleteMessage: a message to log when the trigger is completed. The pattern to follow is the same as thetriggerFiredMessage.
Some of the properties provided above come from the AppConfig object, a wrapper that holds the parameters defined in the application.conf file. For more details about it, I suggest you look at the first instance of the series.
After the creation, the Scheduler must be started in the Ktor module function:
fun Application.module(testing: Boolean = false, koinModules: List<Module> = listOf(appModule)) {
	if (!testing) {
		val jobSchedulerManager by inject<JobSchedulerManager>()
		jobSchedulerManager.startScheduler()
	}
	...
}
Note: The Scheduler is not started when running integration testing with the Ktor test engine
Create a Job
The Job is the representation of the work to be done. It is a class that implements the Job interface, that has only the execute method. In this method, the logic of the Job will be written, giving the freedom to do whatever is necessary. Then, when the Job’s trigger is fired, the method will be called by one of the scheduler’s worker threads.
class MyJob() : Job {
	override fun execute(context: JobExecutionContext?) {
	  // Perform the work here
	}
}
To pass data to a Job, the JobDataMap can be used. This map can hold any serializable data that can be retrieved from the JobExecutionContext parameter on the execute method. The data are provided on the map when the Job is scheduled.
For example, in the following Job, a string is retrieved from the JobDataMap and passed to a method of the jokeRepository:
class RandomJokeJob(
    private val jokeRepository: JokeRepository
) : Job {

    override fun execute(context: JobExecutionContext?) {
        if (context == null) {
            return
        }

        val dataMap = context.jobDetail.jobDataMap

        val name: String? = try {
            dataMap.getString(JOB_MAP_NAME_ID_KEY)
        } catch (e: ClassCastException) {
            null
        }

        if (name != null) {
            val greetingMessage = jokeRepository.getChuckGreeting(name)
            println(greetingMessage)
        }
    }

    companion object {
        const val JOB_MAP_NAME_ID_KEY = "name"
        const val WATCH_JOB_GROUP = "WatchJob"
    }
}
For more information about the JobDataMap, you can look at the documentation.
When a trigger fires, a Job instance must be created. The creation is performed by a default JobFactory that simply calls newInstance on the job class. But, if the Job requires some dependencies, a custom factory must be created by implementing the JobFactory interface:
class JobFactory(
    private val jokeRepository: JokeRepository
): JobFactory {

    override fun newJob(bundle: TriggerFiredBundle?, scheduler: Scheduler?): Job {
        if (bundle != null) {
            val jobClass = bundle.jobDetail.jobClass
            if (jobClass.name == RandomJokeJob::class.jvmName) {
                return RandomJokeJob(jokeRepository)
            }
        }
        throw NotImplementedError("Job Factory error")
    }
}
From the TriggerFiredBundle it is possible to retrieve the class name of the triggered Job and return the right Job class with the required dependencies. If the Job is not known, an exception will be thrown.
Schedule a Job
The first thing to do to schedule a Job is create a JobDetail, an object that contains all the detail properties of a Job instance. The JobDetail can be created with the JobBuilder.
val jobId = "chuck-watch-job-for-name-$name"

val job: JobDetail = JobBuilder.newJob(RandomJokeJob::class.java)
      .withIdentity(jobId, RandomJokeJob.WATCH_JOB_GROUP)
      .usingJobData(RandomJokeJob.JOB_MAP_NAME_ID_KEY, "value")
      .build()
It is necessary to provide to the builder a Job key and a Job group. The key is necessary to identify the Job and every Job can be placed inside a ”group”, which can be useful for organizing different Jobs into different categories. In the end, the Job is uniquely identified with the combination of the key and the group, for this reason, the key must be unique inside the group.
After creating the JobDetail, it is necessary to create a Trigger. A Trigger is responsible for firing the Job at the scheduled time.
val triggerId = "chuck-watch-trigger-for-name-$name"

val trigger: Trigger = TriggerBuilder.newTrigger()
      .withIdentity(triggerId, RandomJokeJob.WATCH_JOB_GROUP)
      .withSchedule(
          SimpleScheduleBuilder.simpleSchedule()
              // every minute
              .withIntervalInMinutes(1)
              .repeatForever()
      )
      .build()
A Trigger can be created with a TriggerBuilder. As for the JobDetail, the builder requires a key and a group.
Quartz has different Trigger types and the most used ones are the SimpleTrigger and the CronTrigger. The former is used to schedule “one-shot” jobs that can be repeated 1 or multiple times while the latter is used to schedule calendar-like jobs (for example run a Job every Saturday at 3 am).
The type of trigger can be chosen with the withSchedule method of the TriggerBuilder by providing a SimpleScheduleBuilder or a CronScheduleBuilder:
.withSchedule(
	SimpleScheduleBuilder.simpleSchedule()
	  // every minute
	  .withIntervalInMinutes(1)
	  .repeatForever()
)
In this case, I used a SimpleScheduleBuilder since I want the Job to be repeated every minute forever.
And finally, everything is ready to schedule the Job:
jobSchedulerManager.scheduler.scheduleJob(job, trigger)
And every minute, the Job will be called and a message is shown in the console.

As a reference, here is the entire method responsible for scheduling the Job.
override suspend fun watch(name: String) {
  val jobId = "chuck-watch-job-for-name-$name"
  val triggerId = "chuck-watch-trigger-for-name-$name"

  // If a job exists, delete it!
  val jobScheduler = jobSchedulerManager.scheduler
  val jobKey = JobKey.jobKey(jobId, RandomJokeJob.WATCH_JOB_GROUP)
  jobScheduler.deleteJob(jobKey)

  val job: JobDetail = JobBuilder.newJob(RandomJokeJob::class.java)
      .withIdentity(jobId, RandomJokeJob.WATCH_JOB_GROUP)
      .usingJobData(RandomJokeJob.JOB_MAP_NAME_ID_KEY, name)
      .build()

  val trigger: Trigger = TriggerBuilder.newTrigger()
      .withIdentity(triggerId, RandomJokeJob.WATCH_JOB_GROUP)
      .withSchedule(
          SimpleScheduleBuilder.simpleSchedule()
              // every minute
              .withIntervalInMinutes(1)
              .repeatForever()
      )
      .build()

  // Tell quartz to schedule the job using our trigger
  jobSchedulerManager.scheduler.scheduleJob(job, trigger)
}
Conclusions
And that’s it for today. You can find the code mentioned in the article on GitHub.