Structuring a Ktor project
SERIES: Building a backend with Ktor
- Part 1: Structuring a Ktor project
- Part 2: How to persist Ktor logs
- Part 3: How to use an in-memory database for testing on Ktor
- Part 4: How to handle database migrations with Liquibase on Ktor
- Part 5 Generate API documentation from Swagger on Ktor
- Part 6: How to schedule jobs with Quartz on Ktor
- Part 7: Moving from mobile to backend development with Ktor
It’s been a few months since I’ve started working with Ktor to build the backend of Revelop. We decided to go with Ktor because it is a lightweight framework, easy to use and with a gentle learning curve even for a mobile developer.
Today I decided to start a series of posts dedicated to Ktor. With these articles, I want to cover all the topics that made me struggle during development and that was not easy to achieve out of the box. To cite a few: using an in-memory database for testing, handling database migration, setting up logging on disk and using dependency injection.
In this first instance of the series, I will show how I’ve structured the Ktor project I’m working on. I’ll cover dependency injection, configurations, and testing.
But before moving on, a quick introduction about Ktor is mandatory.
Ktor is an asynchronous framework for creating microservices, web applications, and more. It’s fun, free, and open source.
From ktor.io
Ktor is a lightweight framework that lets easily build backends, web applications, mobile and browser applications. It can be used to create both server and client-side applications (it is compatible with Kotlin Multiplatform as well). Ktor is highly configurable with extensions and it is possible to configure a custom pipeline through a Kotlin DSL. And finally, Ktor is truly asynchronous and uses Kotlin Coroutines to make the development easier without the callback hell.
This is “an elevator pitch” of Ktor, to know all the details I’ll suggest looking to the documentation.
Create a new Ktor Project
The starting point of a Ktor project definitely lies in the wizard included in IntelliJ. The wizard lets you choose between all the different features that Ktor provides and it will generate a bare-bone project ready to be used.

If you don’t like IntelliJ, the wizard is also available on start.ktor.io.
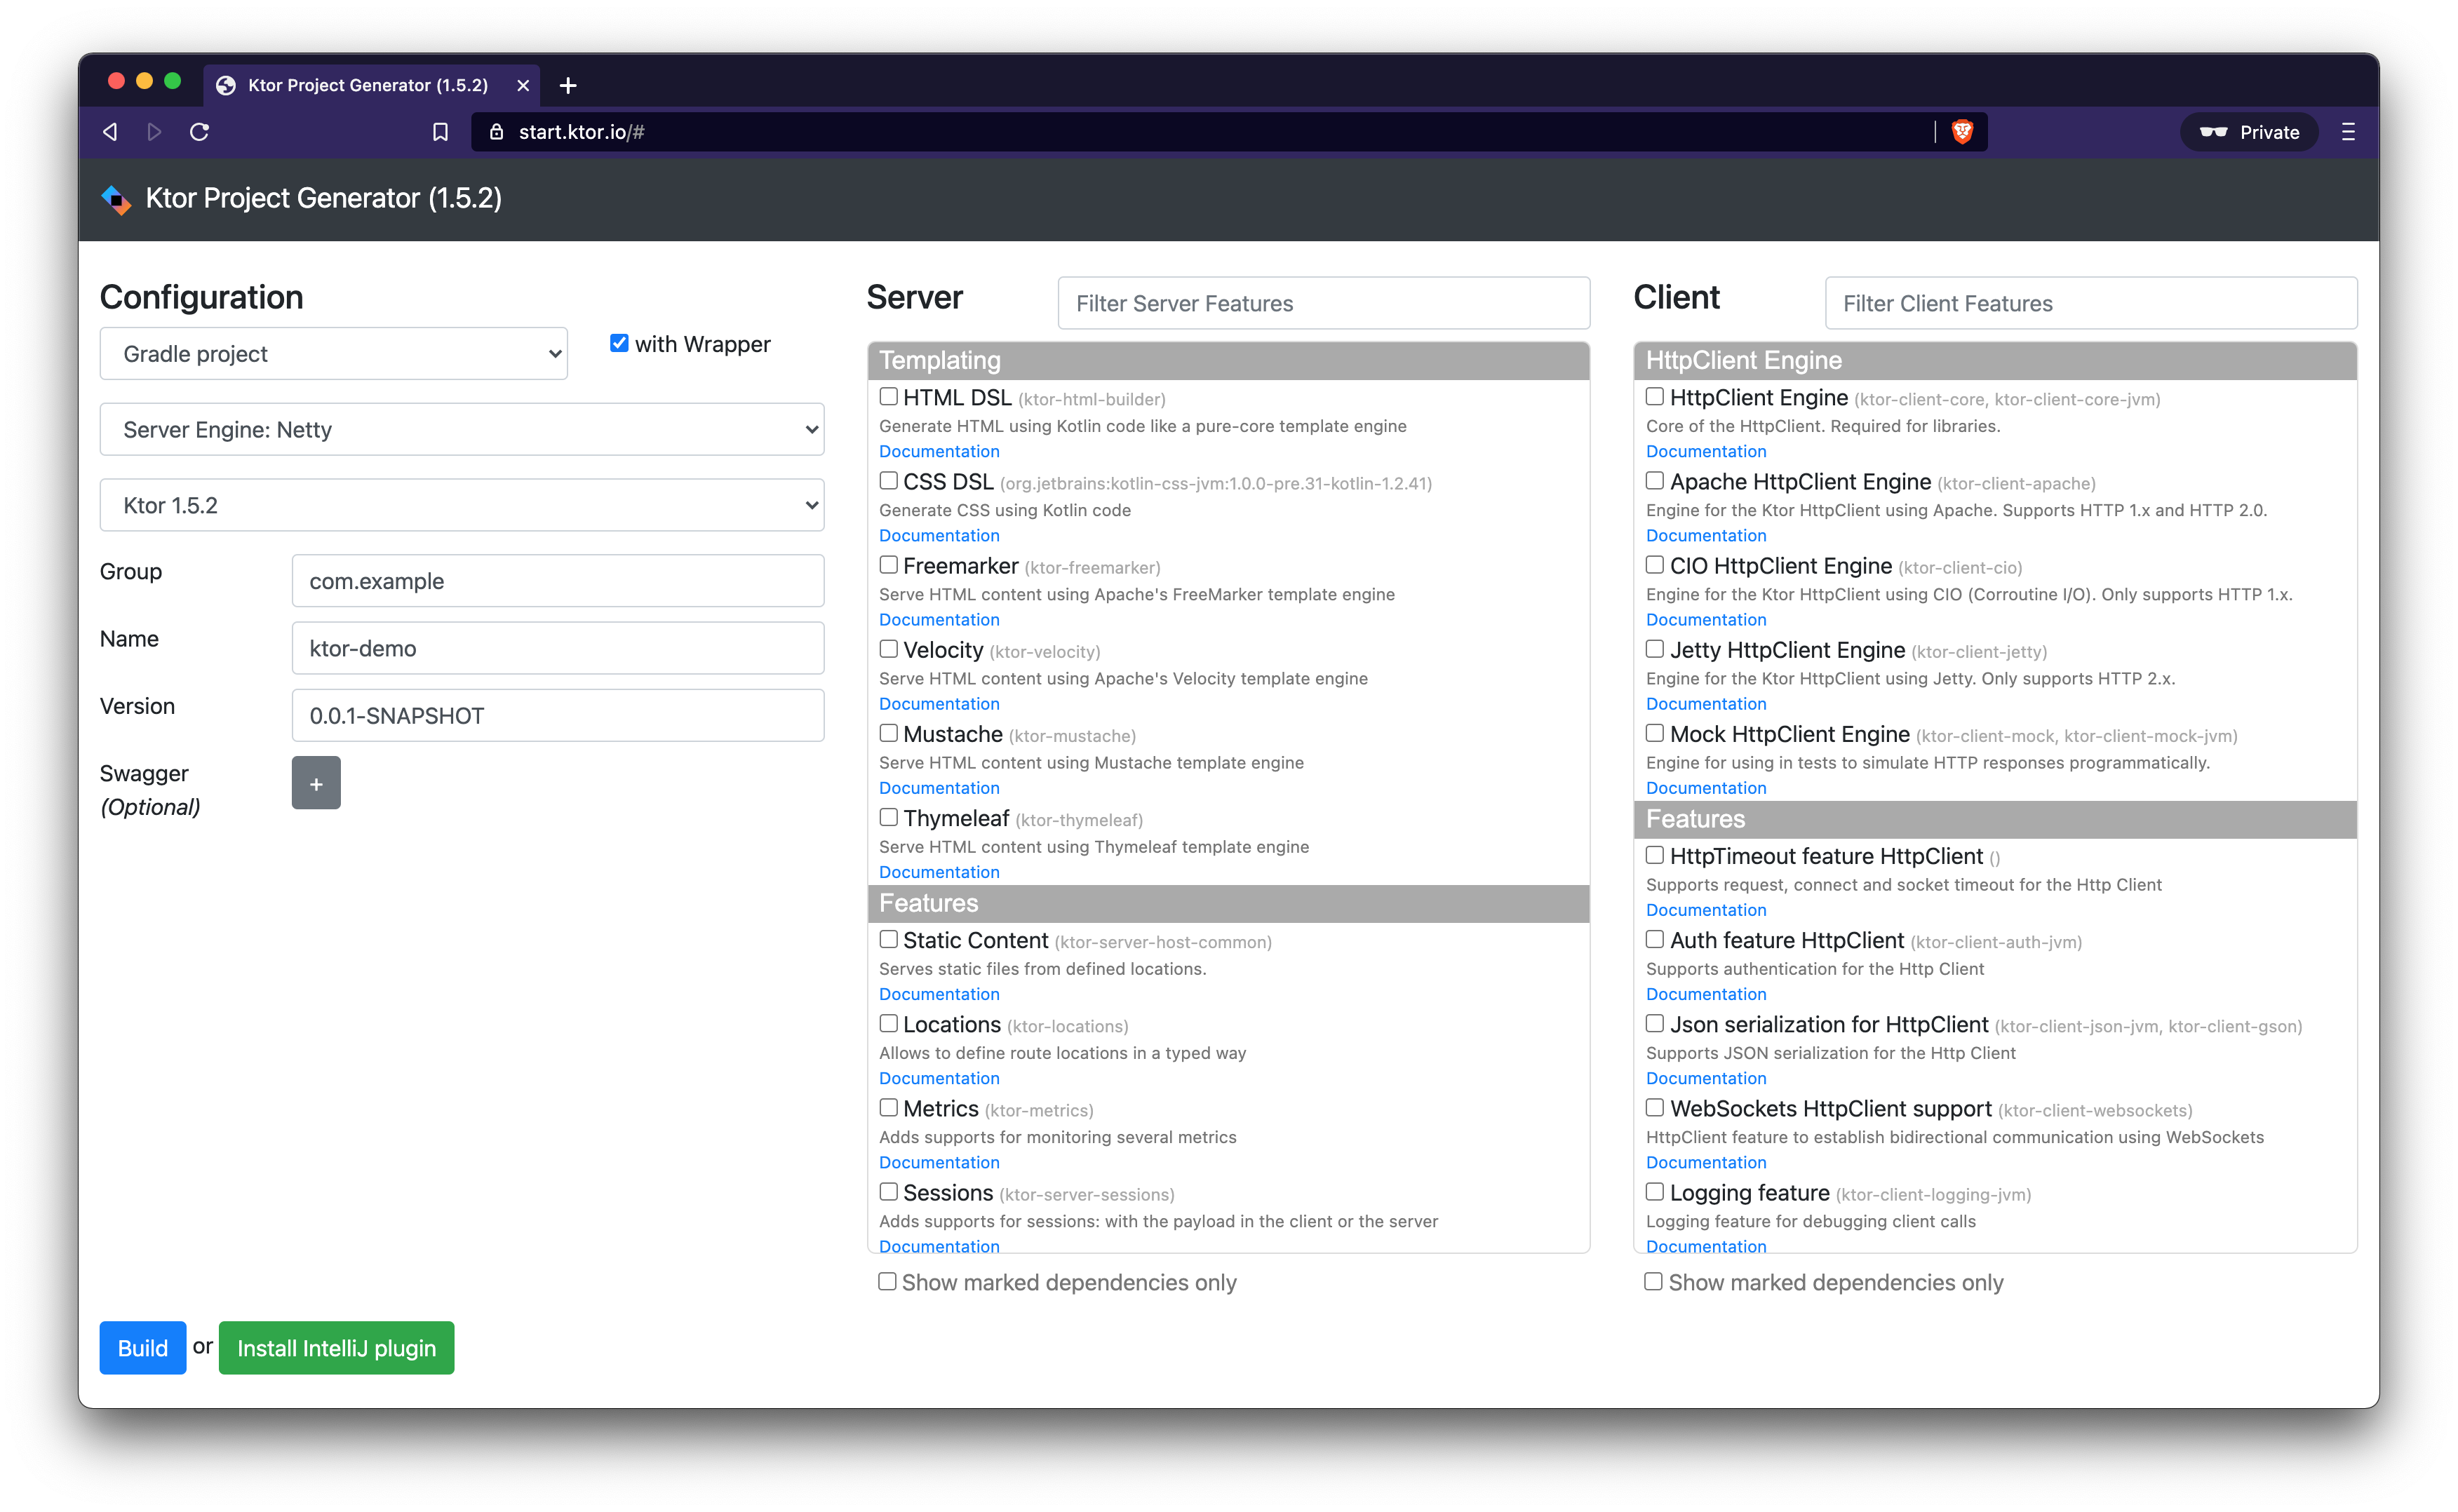
The project that I built as a reference for this series contains a few set of features:
- Call Logging
- Content Negotiation
- kotlinx.serialization
- Locations
- Routing
The project is a simple backend that returns random Chuck Norris jokes. The jokes are saved in a database and they came from the Chuck Norris IO project.
The wizard creates a default Application.kt file that contains the module function that initializes the server pipeline, install the selected features, register the routes, etc. In this function, all the configurations and the classes needed to run the server must be provided or initialized.
Dependency Injection with Koin
Before moving on, it is a good idea to setup Dependency Injection. I’ll use Koin, that has built-in support for Ktor.
// Koin for Ktor
implementation "io.insert-koin:koin-ktor:$koin_version"
// SLF4J Logger
implementation "io.insert-koin:koin-logger-slf4j:$koin_version"
To use Koin, it is necessary to install the appropriate feature inside the module function. I recommend doing it as the first thing in the setup pipeline.
install(Koin) {
    slf4jLogger()
    modules(appModule)
}
val appModule = module {
    single<MyClass>()
    single<JokeRepository> { JokeRepositoryImpl() }
}
The Koin module is defined in a separate file, just to keep the Application class and the Ktor module function as clean as possible.
After that, the dependency graph is built, and inside Application, Routing and Route scope, it is possible to retrieve the dependencies like in a KoinComponent
val myClass by inject<MyClass>()
For more information about Koin on Ktor, refer to the documentation
Configuration
On Ktor it is possible to set some configurations, like host address and port, in code (if using the embeddedServer) or in an external file (application.conf) with the HOCON format (if using the EngineMain).
The wizard automatically creates an application.conf file in the application resources directory.
ktor {
  deployment {
    port = 8080
    port = ${?PORT}
  }
  application {
    modules = [com.prof18.ktor.chucknorris.sample.ApplicationKt.module]
  }
}
.
└── src
    ├── main
    │   ├── kotlin
    │   │   └── com
    │   │       └── ...
    │   └── resources
    │       ├── application.conf
    └── test
        ├── kotlin
        │   └── com
        │       └── ...
        └── resources
            ├──  ...
This configuration file will be automatically loaded and parsed by Ktor when the server is started. It is also possible to provide a custom configuration file instead of the one from resources with a command-line argument:
java -jar ktor-backend.jar -config=/config-folder/application.conf
This is helpful for example to provide different configurations for databases or for external service (in part 3 I’ll show a use case of this feature).
But, besides the default value provided by the framework, it is possible to create custom configurations to use later in the code. For example, I’ve created a new section with a Boolean field that will indicate if the instance is running on a staging or production server.
ktor {
  ...
  server {
    isProd = false
  }
  ...
}
Every section will be mapped in the code with a data class
data class ServerConfig(
    val isProd: Boolean
)
that is contained in a wider class, named AppConfig with all the different custom configurations.
class AppConfig {
    lateinit var serverConfig: ServerConfig
    // Place here other configurations
}
The fields of this class then will be initialized inside the Application scope.
fun Application.setupConfig() {
    val appConfig by inject<AppConfig>()

    // Server
    val serverObject = environment.config.config("ktor.server")
    val isProd = serverObject.property("isProd").getString().toBoolean()
    appConfig.serverConfig = ServerConfig(isProd)
}
With this setup, when a configuration field must be accessed, the AppConfig class can be simply retrieved from Koin.
Project structure
The structure of a project is a completely subjective topic and it does not invalidate the functionalities nor the correct behavior. However, I think that properly structuring a project is beneficial for better maintainability and scalability.
Here, I will share a structure that worked for me and that I found interesting. If you have any suggestion about alternative structures or if you notice something wrong in what I’m sharing, feel free to reach me out on Twitter @marcoGomier.
Since the Application.kt file is the entrypoint for the server, I left it at the root level of the src > main > kotlin > <package-name> folder.
Then, I’ve created a bunch of folders that contain “configuration code”:
di: it contains the code where theKoinmodules are defined, as described aboveconfig: it contains the code that maps the configuration fields from theapplication.conffile, as described abovedatabase: it contains the code necessary to open (and close) the connection to the database. I’ll describe it in the next articles of the series.
.
├── Application.kt
├── config
│   └── AppConfig.kt
├── database
│   ├── DatabaseFactory.kt
│   └── DatabaseFactoryImpl.kt
├── di
    └── AppModule.kt
Then, I’ve created the features folder. This top-level folder contains, as the name suggests, all the different features of the backend. For example, if the backend provides a set of API calls to authenticate a user, to handle jokes (get, create, delete, etc), and to handle the user (logout, update some settings, etc) there will be three different folders:
.
├── features
    ├── auth
    │   └── ...
    ├── jokes
    │   └── ...
    └── user
        └── ...
In the sample project, the backend will provide only an API to get a random Joke, so there will be only a folder named jokes under the features folder.
The structure of every “feature folder” will follow some principles of the Clean Architecture. I’ve decided to stick with it because I’ve used it in some Android projects and I like it. But, this will be an adapted solution with only some aspects of the architecture. If you don’t know Clean Architecture and you want to know more about it, I suggest giving a look at the Uncle Bob’s article and, if you are an Android developer, to this Ray Wenderich’s article.
The layers of Clean Architecture that I’ve used here are 3:
- data
- domain
- presentation
The data layer contains the definitions of all the data sources. In this case, all the needed data are contained in the database, so there will be only code needed to interact with the database.
└── jokes
    ├── data
        ├── JokeLocalDataSource.kt
        ├── JokeLocalDataSourceImpl.kt
        └── dao
            └── Joke.kt
If the backend needs also to retrieve data from other APIs, here there will be also a remote data source.
└── jokes
    └── data
        ├── local
        │   ├── JokeLocalDataSource.kt
	│   ├── JokeLocalDataSourceImpl.kt
	│   └── dao
	│       └── Joke.kt
        └── remote
            ├── JokeRemoteDataSource.kt
	    ├── JokeRemoteDataSourceImpl.kt
	    └── dto
	        └── JokeRemoteDTO.kt
The domain layer contains the models, the business logic, and the mappers between the DAOs and the DTOs. The business logic is implemented by following the Repository pattern. The repository will contain the code necessary to retrieve, save and manipulate data from the data sources.
└── jokes
    ├── domain
        ├── JokeRepository.kt
        ├── JokeRepositoryImpl.kt
        ├── mapper
        │   └── DTOMapper.kt
        └── model
            └── JokeDTO.kt
And at the end, the presentation layer. Since this is not an application with a user interface, I decided to change the name from presentation to resource. In this layer, there will be the definitions of the REST endpoints that the backend exposes. I’ve decided to use the word resource because I like to think that REST endpoints are resources that give or handle data. This is just a personal opinion, for example, you can call these layer `controller or whatever.
└── jokes
    └── resource
	└── JokeResource.kt
The JokeResource file will contain the classes that define each route and an extension function of Route that contains the definition of every endpoint.
@Location("joke")
class JokeEndpoint {

    @Location("/random")
    class Random(val parent: JokeEndpoint)
}

fun Route.jokeEndpoint() {

    val jokeRepository by inject<JokeRepository>()

    get<JokeEndpoint.Random> {
        call.respond(jokeRepository.getRandomJoke())
    }
}
Using an extension function, unlock the possibility to have a much cleaner module function: in this way, it is possible to define the endpoints in different files and call them inside the routing block in the module function.
fun Application.module(...) {
    ...
    routing {
        jokeEndpoint()
        ...
    }
    ...
}
And as reference, here’s the entire structure that I’ve described:
.
└── sample
    ├── Application.kt
    ├── config
    │   └── AppConfig.kt
    ├── database
    │   ├── DatabaseFactory.kt
    │   └── DatabaseFactoryImpl.kt
    ├── di
    │   └── AppModule.kt
    └── features
        └── jokes
            ├── data
            │   ├── JokeLocalDataSource.kt
            │   ├── JokeLocalDataSourceImpl.kt
            │   └── dao
            │       └── Joke.kt
            ├── domain
            │   ├── JokeRepository.kt
            │   ├── JokeRepositoryImpl.kt
            │   ├── mapper
            │   │   └── DTOMapper.kt
            │   └── model
            │       └── JokeDTO.kt
            └── resource
                └── JokeResource.kt
Testing
And last but not least, testing. Ktor is designed to allow easily testable applications. It does not create a web server but it hooks directly into the internal mechanism with a TestEngine. In this way, the execution of tests will be quicker rather than spinning up a complete web server for testing.
With the withTestApplication function it is possible to set up a test environment and then, with the handleRequest function it is possible to perform the request and verify that the results are the same as expected.
@Test
fun testRequests() = withTestApplication(module(testing = true)) {
    with(handleRequest(HttpMethod.Get, "/")) {
        assertEquals(HttpStatusCode.OK, response.status())
        assertEquals("Hello from Ktor Testable sample application", response.content)
    }
}
However, before testing the endpoints, it is necessary to set up the dependencies that the system under test will use and all the custom configurations defined in the application.conf.
To populate the configurations, the MapApplicationConfig can be used and passed to the withTestApplication function.
fun MapApplicationConfig.createConfigForTesting() {
    // Server config
    put("ktor.server.isProd", "false")
}

@Test
fun testRequests() = withTestApplication({
    (environment.config as MapApplicationConfig).apply {
       createConfigForTesting()
    }
    module(testing = true) // Call here your application's module
}) {
    ...
}
The dependencies instead will be automatically provided by Koin. But, to provide a fake implementation of a dependency, some changes must be made.
As described above, the Koin module is ”hardcoded” inside the Ktor module function (to be precise is defined in another file but not injected in the constructor).
install(Koin) {
    slf4jLogger()
    modules(appModule)
}
To modify the Koin module during testing, I’ve modified the Ktor module function to accept a list of Koin modules. This list has as the default value the Koin module that was previously hardcoded.
fun Application.module(testing: Boolean = false, koinModules: List<Module> = listOf(appModule)) {
    install(Koin) {
        slf4jLogger()
        modules(koinModules)
    }
}
In this way, during testing, it is possible to change one or more dependencies.
val appTestModule = module {
    single<AppConfig>()
    single<DatabaseFactory> { DatabaseFactoryForServerTest() }
    single<JokeLocalDataSource> { JokeLocalDataSourceImpl() }
}

val fakeRepositoryModule = module {
    single<JokeRepository> { FakeJokeRepository() }
}

@Test
fun testRequests() = withTestApplication({
    (environment.config as MapApplicationConfig).apply {
       createConfigForTesting()
    }
    module(testing = true, koinModules = listOf(appTestModule, fakeRepositoryModule))
}) {
    ...
}
Conclusion
Although it seems a boring task, structuring a project is a very important thing. In fact, starting with an unsafe foundation will put your product in danger, making it unscalable and hard to maintain throughout the time. However, there isn’t a right way to structure a project because every project is different and has different needs. What I suggest to do, is to find the right solution for your needs and the structure that I’ve shared here is the one that satisfied me.
And that’s it for today. You can find the code mentioned in the article on GitHub.
In the next episodes, I’ll cover logging and databases. You can follow me on Twitter to know when I’ll publish the next episode.