Introducing Kotlin Multiplatform in an existing project
After discovering a new interesting technology or framework, you will probably start asking yourself how to integrate it into an existing project. That’s because, the possibility to start with a blank canvas is rare (not impossible, but rare).
This is also the case for Kotlin Multiplatform (I’ll call it KMP in the rest of the article).
When starting a new blank KMP project it is easier to have a mono-repo structure like this:
.
└── kmm-project
    ├── androidApp
    ├── iosApp
    └── shared
However, existing projects most likely don’t have a mono-repo structure. And making a refactor to achieve this structure can be extremely difficult for time or management constraints. But KMP is built around the concept of sharing as much non-UI code as possible, and it is possible to start sharing a little piece of tech stack. Then, this “little piece of tech stack” will be served to the existing projects as a library.
Where to start from is subjective and it depends on the specific project, but there are some parts that better suit this topic. For example, all the boilerplate code (constants, data models, DTOs, etc), that is boring to write and is more error-prone. Or it could be a feature that centralizes the source of truth (e.g. if a field is nullable or not) because with a single source of truth there will also be a single point of failure. Or it could be some utility or analytics helper that every project has.
An important thing to take in mind is that all the features chosen for sharing must have the possibility to be extracted gradually. That’s because, during the evaluation process of KMP, it is better to make a final decision without using too much time. For example, it will be not a good idea to start sharing the entire network layer because you will risk ending up with useless work if KMP is not the right solution for the project. Otherwise, starting with some small features like a DTO or a data model will require less “extraction time” and it will leave enough time to work on the architecture needed to have a Kotlin Multiplatform library in an existing project.
For example, at Uniwhere we have decided to start with some DTOs and after validating the process, we have migrated all the others.
Publishing Architecture
The architecture of an existing project with Kotlin Multiplatform will look like this:

There is a repository for every platform:
- a repository for the KMP library;
- a repository for the Backend;
- a repository for the Android app;
- a repository for the iOS app.
As mentioned early on, the KMP code is served as a library. The compiler generates a .jar for the JVM, a .aar for Android, and a Framework for iOs. The .jar and the .aar can be published in a Maven repository. A Framework can be published in different places: for example in a CocoaPods repository, in the Swift Package Manager or with Carthage. Since I’m familiar with CocoaPods (and because we are using it at Uniwhere), I’ve decided to stick with it.
Publishing for Android and the JVM
The amount of work needed to publish a JVM and an Android library to Maven is pretty straightforward, thanks to the Maven Publish Plugin. Only a few lines of configuration on the build.gradle.kts file, are necessary (here I’m assuming that you have already configured a Maven repository since it’s not the scope of the article to explain how. Otherwise, you can use a local Maven repository on your computer that does not require any kind of configuration):
plugins {
    //...
    id("maven-publish")
}

group = "<your-group-id>"
artifactId = "<your-library-name>" // If not specified, it will use the name of the project
version = "<version-name>"

// This block is only needed to publish on a online maven repo
publishing {
    repositories {
        maven{
            credentials {
                username = "<username>"
                password = "<pwd>"
            }
            url = url("https://mymavenrepo.com")
        }
    }
}
After that, it is possible to build and publish the KMP library with the ./gradlew publish command (or with ./gradlew publishToMavenLocal).
Then, it is possible to pull the library on Android:
implementation("<your-group-id>:<your-library-name>-android:<version-name>")
and on the JVM project:
implementation("<your-group-id>:<your-library-name>-jvm:<version-name>")
Publishing for iOs
On iOS things are harder.
Pack for Xcode
On newly created KMP projects, there is a Gradle task, named packForXcode, that automatically builds the framework and places it in a specific build folder.
val packForXcode by tasks.creating(Sync::class) {
    group = "build"
    val mode = System.getenv("CONFIGURATION") ?: "DEBUG"
    val sdkName = System.getenv("SDK_NAME") ?: "iphonesimulator"
    val targetName = "ios" + if (sdkName.startsWith("iphoneos")) "Arm64" else "X64"
    val framework = kotlin.targets.getByName<KotlinNativeTarget>(targetName).binaries.getFramework(mode)
    inputs.property("mode", mode)
    dependsOn(framework.linkTask)
    val targetDir = File(buildDir, "xcode-frameworks")
    from({ framework.outputDirectory })
    into(targetDir)
}
tasks.getByName("build").dependsOn(packForXcode)
This task is automatically called by Xcode when the iOS (or macOS) application is built.
The task uses the configuration of the iOS project to define the build mode and the target architecture.
val mode = System.getenv("CONFIGURATION") ?: "DEBUG"
val sdkName = System.getenv("SDK_NAME") ?: "iphonesimulator"
val targetName = "ios" + if (sdkName.startsWith("iphoneos")) "Arm64" else "X64"
The build mode can be RELEASE or DEBUG while the target name depends on the architecture which we are building for. The real devices use the Arm64 architecture, while the simulator uses the host computer architecture which in most of the cases is X64 (at least until when Apple Silicon will be sufficiently spread).
And this is the problem of this task!
Since the aim is to publish a framework to be used by an existing project, it’s impossible to know a priori which architecture is necessary or the build mode.
Update: Starting from Kotlin 1.5.20, there is a new task provided by the Kotlin Multiplatform Gradle Plugin named
embedAndSignAppleFrameworkForXcodethat replaces thepackForXcodeone. The aim of this task is the same as the old one, that is publishing a framework to be used by an existing project. So it’s impossible to know a priori which architecture is necessary or the build mode. For more info, give a look at the Jetbrains blogpost.
CocoaPods Gradle Plugin
Another way to build a framework from the KMP code is using the CocoaPods Gradle Plugin. This plugin builds the framework and places it inside a CocoaPods repository that will be added as dependency on Xcode (The plugin can be used also to add other Pod libraries on the native target).
To start using the plugin, some configurations are necessary:
plugins {
     kotlin("multiplatform") version "1.4.10"
     kotlin("native.cocoapods") version "1.4.10"
 }

 // CocoaPods requires the podspec to have a version.
 version = "1.0"

 kotlin {
     cocoapods {
         // Configure fields required by CocoaPods.
         summary = "Some description for a Kotlin/Native module"
         homepage = "Link to a Kotlin/Native module homepage"

         // You can change the name of the produced framework.
         // By default, it is the name of the Gradle project.
         frameworkName = "<framework-name>"
     }
 }
Then, during the build, the Podspec file (a file that describes the Pod library - it contains the name, version, and description, where the source should be fetched from, what files to use, the build settings to apply, etc) is generated starting from the information provided in the cocoapods block.
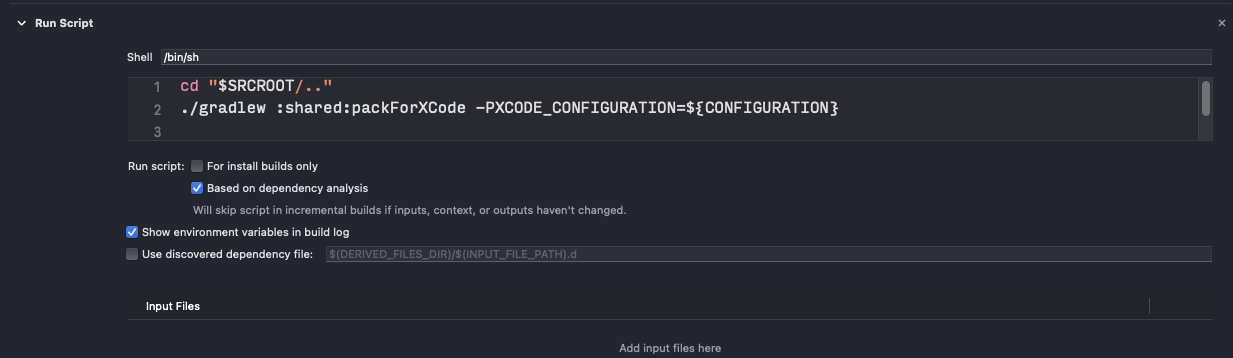
The Podspec contains also a script that is automatically added as a build script, called every time the iOS application is built, like packForXcode.
spec.script_phases = [
    {
        :name => 'Build shared',
        :execution_position => :before_compile,
        :shell_path => '/bin/sh',
        :script => <<-SCRIPT
            set -ev
            REPO_ROOT="$PODS_TARGET_SRCROOT"
            "$REPO_ROOT/../gradlew" -p "$REPO_ROOT" :shared:syncFramework \
                -Pkotlin.native.cocoapods.target=$KOTLIN_TARGET \
                -Pkotlin.native.cocoapods.configuration=$CONFIGURATION \
                -Pkotlin.native.cocoapods.cflags="$OTHER_CFLAGS" \
                -Pkotlin.native.cocoapods.paths.headers="$HEADER_SEARCH_PATHS" \
                -Pkotlin.native.cocoapods.paths.frameworks="$FRAMEWORK_SEARCH_PATHS"
        SCRIPT
    }
]
Unfortunately, this script has the same problems as packForXcode, because the configuration and the target architecture are computed during the build phase.
-Pkotlin.native.cocoapods.target=$KOTLIN_TARGET \
-Pkotlin.native.cocoapods.configuration=$CONFIGURATION \
So, also the CocoaPods Gradle Plugin can’t be used.
Fat Framework
The solution is to use a Fat Framework that contains the code for every required architecture. To build it, there is a Gradle task named FatFrameworkTask that can be customized to meet the specific needs.
The first step is building a custom Gradle task to build a debug version of the Fat Framework.
tasks {
    register("universalFrameworkDebug", org.jetbrains.kotlin.gradle.tasks.FatFrameworkTask::class) {
        baseName = libName
        from(
            iosArm64().binaries.getFramework("<your-library-name>", "Debug"),
            iosX64().binaries.getFramework("<your-library-name>", "Debug")
        )
        destinationDir = buildDir.resolve("<fat-framework-destination>")
        group = "<your-library-name>"
        description = "Create the debug fat framework for iOs"
        dependsOn("link<your-library-name>DebugFrameworkIosArm64")
        dependsOn("link<your-library-name>DebugFrameworkIosX64")
    }
}
This custom Gradle task, named universalFrameworkDebug is necessary to provide some customizations to the FatFrameworkTask. After some cosmetic info, like the name and the group of the Framework, the required architectures and configurations must be provided. In this case, the required architectures are x64 for the simulator and arm64 for the real devices. The configuration instead is Debug.
from(
    iosArm64().binaries.getFramework("<your-library-name>", "Debug"),
    iosX64().binaries.getFramework("<your-library-name>", "Debug")
)
The last needed information is the destination of the framework.
destinationDir = buildDir.resolve("<fat-framework-destination")
The destination will be a CocoaPods repository that at the end is a git repository that contains the framework, the debug symbols, and a Podspec file.
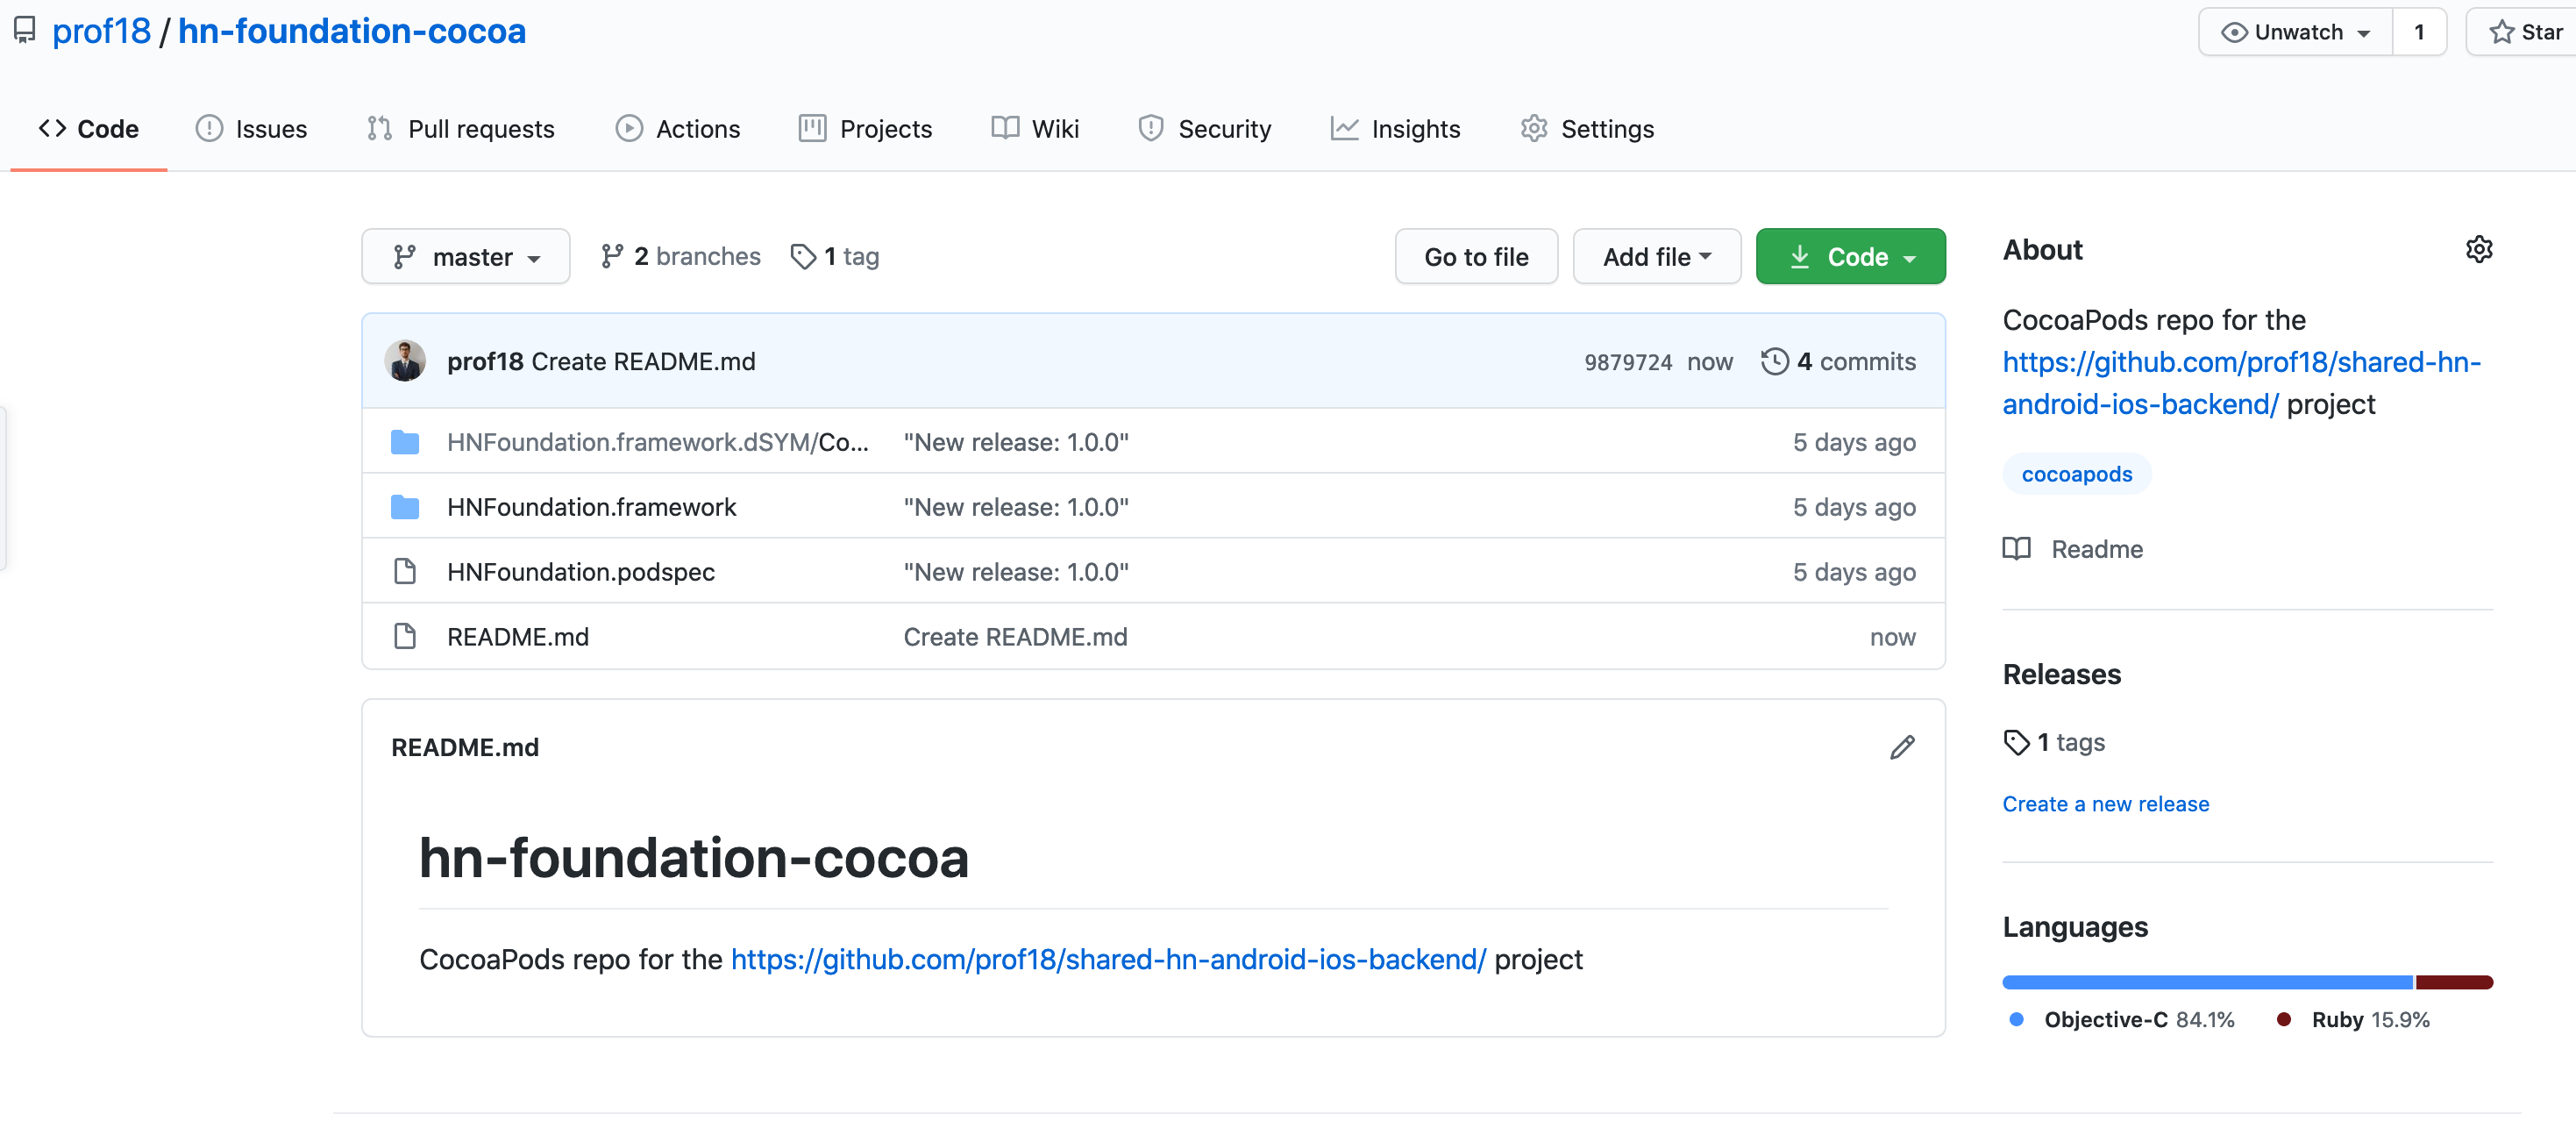
An example of a CocoaPod repo hosted on a git repo
The git repository uses branches and tagging for handling debug and release versions. The debug versions of the Framework are pushed directly to the develop branch without any tagging. The release version instead is pushed on master and tagged.
For more information about setting up a private CocoaPod repo, I suggest you give a look at the official documentation.
After pushing the changes on git, the Pod library is ready to be pulled by XCode. On the Podfile of the iOs project, is necessary to specify the Pod library with the information about the source and the version.
For debug releases, it is enough to specify to pull the latest version from the develop branch
pod '<your-library-name>', :git => "git@github.com:<git-username>/<repo-name>.git", :branch => 'develop'
For production releases instead, it is better to specify the required version number.
pod '<your-library-name>', :git => "git@github.com:<git-username>/<repo-name>.git", :tag => '<version-number>'
The last step is building another Gradle task, to build a release version of the Fat Framework.
tasks {
    register("universalFrameworkRelease", org.jetbrains.kotlin.gradle.tasks.FatFrameworkTask::class) {
        baseName = libName
        from(
            iosArm64().binaries.getFramework("<your-library-name>", "Release"),
            iosX64().binaries.getFramework("<your-library-name>", "Release")
        )
        destinationDir = buildDir.resolve("<fat-framework-destination>")
        group = "<your-library-name>"
        description = "Create the debug fat framework for iOs"
        dependsOn("link<your-library-name>ReleaseFrameworkIosArm64")
        dependsOn("link<your-library-name>ReleaseFrameworkIosX64")
    }
}
The script is the same as the previous one, with the exception that the target is changed from Debug to Release.
And, that’s it! Finally, it is possible to start using the KMP library on iOS as well.
However, there is room for improvement and I wanted to minimize the effort of publishing. All the steps for publishing the framework in the CocoaPods repository can be automated with a Gradle task.
The publishDevFramework task will build the framework and automatically publish the changes in the develop branch of the CocoaPods repository.
tasks {
    register("publishDevFramework") {
        description = "Publish iOs framweork to the Cocoa Repo"

        project.exec {
            workingDir = File("<fat-framework-destination>")
            commandLine("git", "checkout", "develop").standardOutput
        }

        dependsOn("universalFrameworkDebug")

        doLast {
            val dir = File("<fat-framework-destination>/<your-library-name>.podspec")
            val tempFile = File("<fat-framework-destination>/<your-library-name>.podspec.new")

            val reader = dir.bufferedReader()
            val writer = tempFile.bufferedWriter()
            var currentLine: String?

            while (reader.readLine().also { currLine -> currentLine = currLine } != null) {
                if (currentLine?.startsWith("s.version") == true) {
                    writer.write("s.version       = \"${libVersionName}\"" + System.lineSeparator())
                } else {
                    writer.write(currentLine + System.lineSeparator())
                }
            }
            writer.close()
            reader.close()
            val successful = tempFile.renameTo(dir)

            if (successful) {

                val dateFormatter = SimpleDateFormat("dd/MM/yyyy - HH:mm", Locale.getDefault())
                project.exec {
                    workingDir = File("<fat-framework-destination>")
                    commandLine("git", "commit", "-a", "-m", "\"New dev release: ${libVersionName}-${dateFormatter.format(Date())}\"").standardOutput
                }

                project.exec {
                    workingDir = File("<fat-framework-destination>")
                    commandLine("git", "push", "origin", "develop").standardOutput
                }
            }
        }
    }
}
First of all, the task changes the working branch and then builds the debug framework.
project.exec {
    workingDir = File("<fat-framework-destination>")
    commandLine("git", "checkout", "develop").standardOutput
}

dependsOn("universalFrameworkDebug")
Before publishing the new version, the version name inside the Podspec file must be updated.
...
s.name          = "<your-library-name"
s.version       = "<version-name>"
...
And this is done automatically by the task.
val dir = File("<fat-framework-destination>/<your-library-name>.podspec")
...
if (currentLine?.startsWith("s.version") == true) {
    writer.write("s.version       = \"${libVersionName}\"" + System.lineSeparator())
}
And at the end, the new changes are committed and published into the develop branch of the repository.
val dateFormatter = SimpleDateFormat("dd/MM/yyyy - HH:mm", Locale.getDefault())
project.exec {
    workingDir = File("<fat-framework-destination>")
    commandLine("git", "commit", "-a", "-m", "\"New dev release: ${libVersionName}-${dateFormatter.format(Date())}\"").standardOutput
}

project.exec {
    workingDir = File("<fat-framework-destination>")
    commandLine("git", "push", "origin", "develop").standardOutput
}
To publish a release version of the Framework, there is the publishFramework task.
tasks {
    register("publishFramework") {
        description = "Publish iOs framework to the Cocoa Repo"

        project.exec {
            workingDir = File("<fat-framework-destination>")
            commandLine("git", "checkout", "master").standardOutput
        }

        dependsOn("universalFrameworkRelease")

        doLast {
            val dir = File("<fat-framework-destination>/<your-library-name>.podspec")
            val tempFile = File("<fat-framework-destination>/<your-library-name>.podspec.new")

            val reader = dir.bufferedReader()
            val writer = tempFile.bufferedWriter()
            var currentLine: String?

            while (reader.readLine().also { currLine -> currentLine = currLine } != null) {
                if (currentLine?.startsWith("s.version") == true) {
                    writer.write("s.version       = \"${libVersionName}\"" + System.lineSeparator())
                } else {
                    writer.write(currentLine + System.lineSeparator())
                }
            }
            writer.close()
            reader.close()
            val successful = tempFile.renameTo(dir)

            if (successful) {

                project.exec {
                    workingDir = File("<fat-framework-destination>")
                    commandLine("git", "commit", "-a", "-m", "\"New release: ${libVersionName}\"").standardOutput
                }

                project.exec {
                    workingDir = File("<fat-framework-destination>")
                    commandLine("git", "tag", libVersionName).standardOutput
                }

                project.exec {
                    workingDir = File("<fat-framework-destination>")
                    commandLine("git", "push", "origin", "master", "--tags").standardOutput
                }
            }
        }
    }
}
This task is very similar to the publishDevFramework task. First of all, since it is a release, the master branch will be used.
project.exec {
    workingDir = File("<fat-framework-destination>")
    commandLine("git", "checkout", "master").standardOutput
}

dependsOn("universalFrameworkRelease")
Then, before publishing, the commit will be tagged to specify the version name of the release.
project.exec {
    workingDir = File("<fat-framework-destination>")
    commandLine("git", "commit", "-a", "-m", "\"New release: ${libVersionName}\"").standardOutput
}

project.exec {
    workingDir = File("<fat-framework-destination>")
    commandLine("git", "tag", libVersionName).standardOutput
}

project.exec {
    workingDir = File("$rootDir/../../hn-foundation-cocoa")
    commandLine("git", "push", "origin", "master", "--tags").standardOutput
}
And, that’s it! When the KMP library is ready to be published, three tasks can ben called:
publishto publish JVM and Android artifacts;publishDevFrameworkto publish a debug version of the iOs Framework;publishFrameworkto publish a release version of the iOs Framework.
Update: FatFrameworks seems not to be the “current state of the art” solution to distribute multiple architectures at the same time. In fact, Apple during WWDC 2019 has introduced XCFramework, a binary that can contain multiple platform-specific variants (even for iOS and macOS at the same time). To understand how to integrate KMP into existing code, give a look at my new article.
Conclusions
As shown in this article, the process of integrating Kotlin Multiplatform in an existing project requires more work on the architecture side. That’s why is preferable to start sharing a feature that can be extracted gradually.
The framework to follow is:
Start little and then go bigger.
By starting little, it is possible to validate the process with a “contained” effort, and then, after the validation, it is possible to go bigger and start sharing more and more features. For example at Uniwhere, we started sharing the DTOs and after validating the process, we decided to share also the persistence layer with SQLDelight.
All the code that I showed in this article came from a sample that I’ve published on GitHub (if you are interested only in the custom Gradle task, click here). This sample is composed of an Android app, an iOs app, and a backend that share some common code via a Kotlin Multiplatform library.
Update: I’ve grouped all the tasks mentioned in the article in a Gradle plugin! To know more about it, give a look to this post.
Bonus:
I’ve spoke about this topic in a talk in the Kotlin Dev Room at Fosdem 2021.
Here’s the recording of the session:
and the slides: