Flutter or React Native, a cross-platform dilemma - How they work - (Part 3)
Welcome to the third part of this article series about React Native and Flutter. In the latest episode, we have talked about User Interfaces and how to build them in the two frameworks. In this article, we’ll go deeper under the hoods to understand how things work. But I will not go deeper with lot’s of details and implementation things, because I want to make you understand how the thing works at a high level. If you are interested to go deeper, I will leave across the article some links for further information.
But, before moving on, I suggest you read the previous articles of the series if you have lost them.
Flutter or React Native, a cross-platform dilemma - Introduction - (Part 1)
Flutter or React Native, a cross-platform dilemma - How to build User Interfaces - (Part 2)
React Native
Let’s start by analyzing the internals of Rect Native. React Native has an internal infrastructure that is called “the Bridge” and that is built at runtime. The main purpose of the bridge is to create a connection between the native part of the application and the Javascript one, so it can be possible to call native code from the javascript part of the application and vice-versa. The communication between the two different parts is event-driven and in the following gif, you can see an example of that kind of communication.

An example of communication between Native and Javascript
Let’s analyze what happens here. Let’s suppose that we have opened our application. Then, the native code notifies to the bridge that the app has been opened and so the bridge generates a serialized payload that contains that information. This payload is sent to the Javascript code that decides what to do; for example, it decides to render the simple “Hello World” app that we showed in the latest episode. So again, the information is sent back to the bridge that serializes that information and it sends it back to the native code. At this time, the native code has received all the information that it needs to render the view of the application. These exchanges of information are performed in an asynchronous way: the messages are collected in a queue that is flushed every 5 ms by default to avoid too much message sending in a short period of time. Nevertheless, this message passing causes some delays especially with a complex layout or long list with complex items. In fact, the Facebook team is working on a new architecture (codename Fabric) to address this issue and let the UI update synchronously. In just two words, they will get rid of the bridge and the serialization and there will be a Javascript Interface to allow the communication between the Javascript part and the native one. For more information about Fabric I suggest you look to this talk: React Native’s New Architecture - Parashuram N - React Conf 2018
Flutter
Flutter instead works in a completely different way. In fact, all the widgets are managed and rendered using an engine (written in C++). In the figure below, you can see a representation of the Flutter Engine.
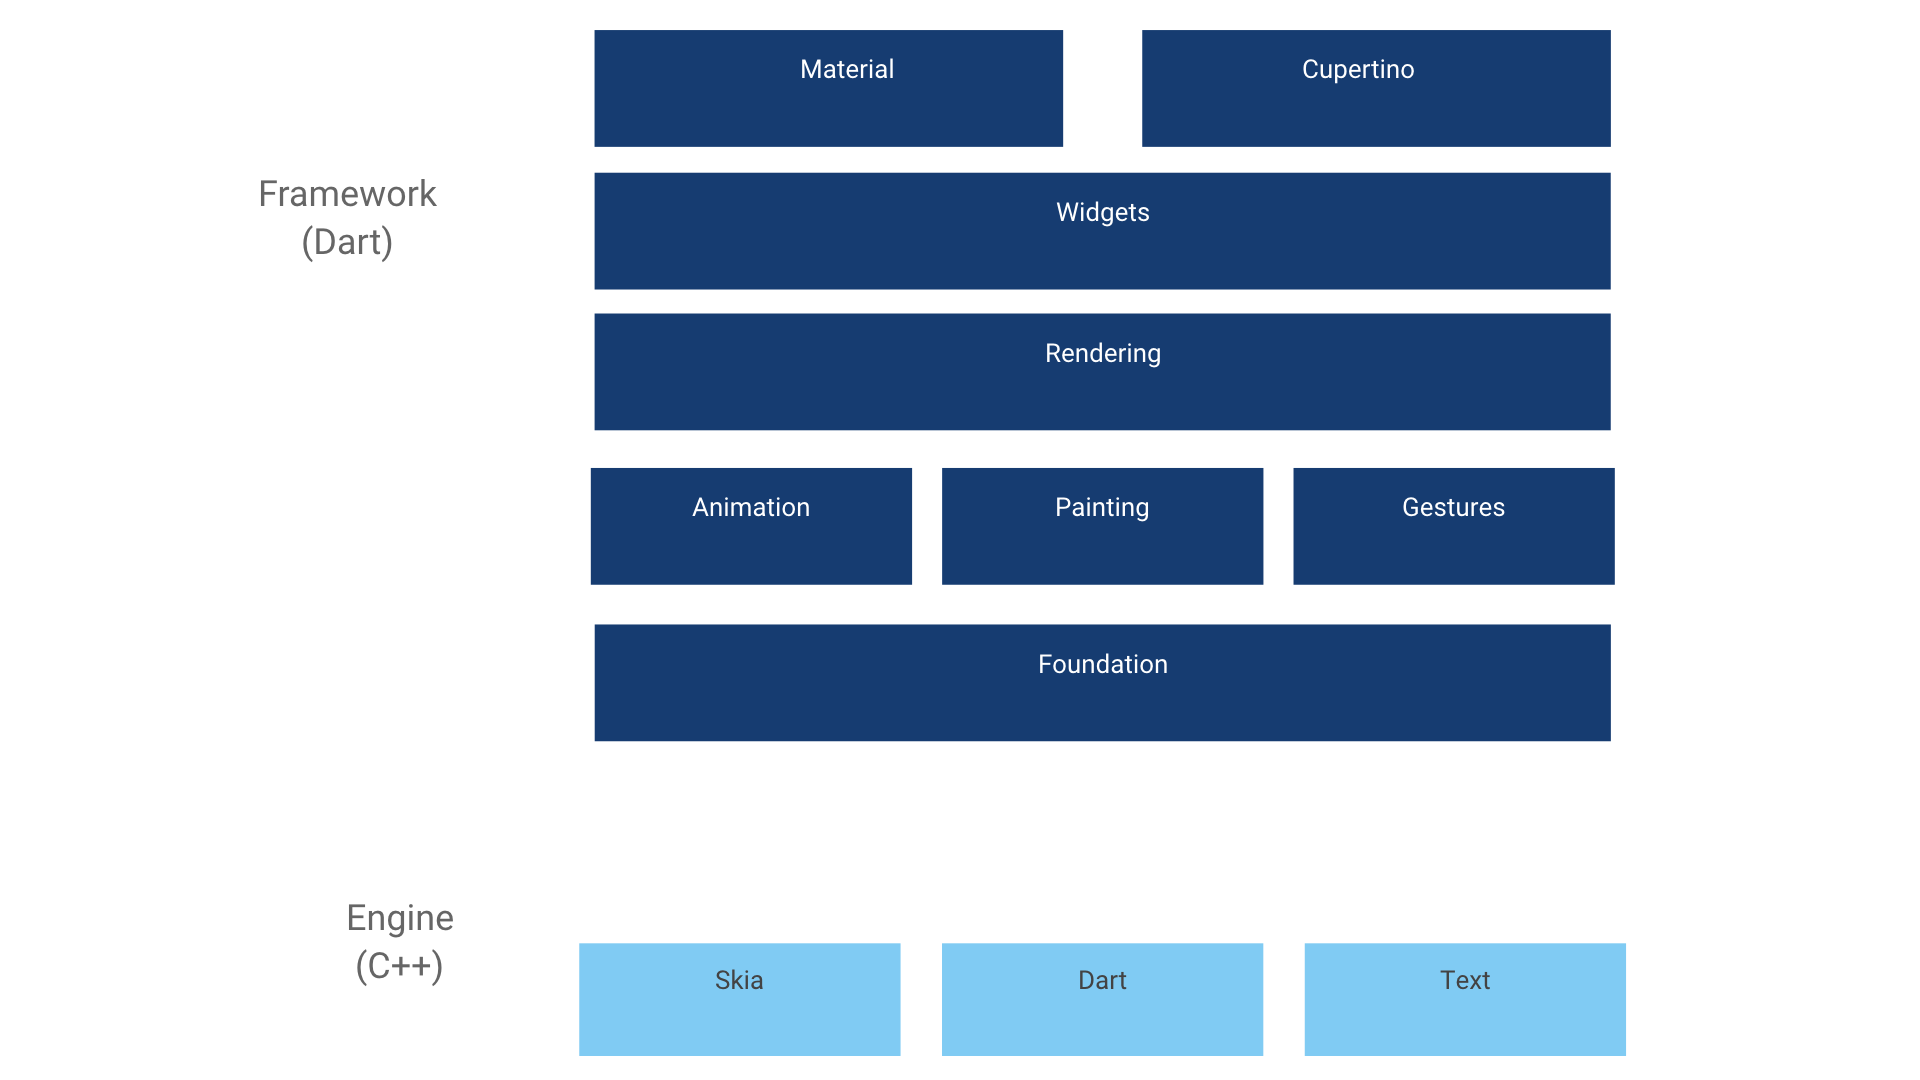
Flutter Engine
As you can see, there is a block called “Skia”. Skia is an open-source 2D graphic library managed by Google and you may already know about it, because it is used by Chrome, Chrome OS, Android, Firefox and many others. And in Flutter, Skia is responsible for rendering the widgets in a canvas. In this way, there isn’t a continuous communication between the “cross-platform technology” and the native part and everything is faster. Moreover, all the Dart code is compiled to native code to speed things up. be aware that the compilation to native code is performed only for production build and for this reason debug builds can be slower.
Comparison
So, in React Native there is a correspondence between the components and the native widgets while Flutter includes its own widgets. This choice has pros and cons. Imagine that Apple and Google update the TextView with some flowers on the shape: an app developed with React Native will ( or better should ) show the flowers without any intervention while an app developed with Flutter won’t show it until the Flutter team will add it on their custom TextView. This is a con because we need to wait for another update if there are new things available on the native UI. The pro instead is that there isn’t any delay due to the bridge initialization and the runtime translation needed to enable the communication between the javascript part and the native one.
Common interesting features
And finally, I want to conclude with some interesting features that both Flutter and React Native have.
Hot Reload
The first one is “Hot Reload”, i.e. the capability of loading new changes without recompiling the entire application again. This feature is really really useful for example when you are trying different colors, font sizes, etc; waiting for an entire recompilation for these little changes it would be such a pain. In Flutter this feature is possible thanks to a combination of Ahead-of-time (AOT) and Just-in-time compilation. In fact, as mentioned earlier, Flutter generates machine code for production builds. For the debug builds instead, there is a virtual machine that can receive the new code, replace the old one and maintain the state. Here you can find more information about hot reload in Flutter.
In React Native instead, the Hot Reload is built on top of Hot Module Replacement by Webpack. Basically there is a runtime included in the app that receives the new code and it replaces the old one. If you are interested in the details, I suggest you read this blog post from Facebook.
Update only components/widgets that have changed
Both Flutter and React Native are declarative frameworks. This means that we define the current UI state (e.g. a loading state, an error state, etc.) and the framework manages the state changes. To achieve these, the framework creates an abstract representation of the UI and when the UI state has changed, it builds a new representation that it will be compared and to the previous one and only the differences will be rendered.
To achieve these, React Native uses a Virtual DOM as UI representation (as you can see in the image below, basically a JSON file that contains all the information about the UI component).
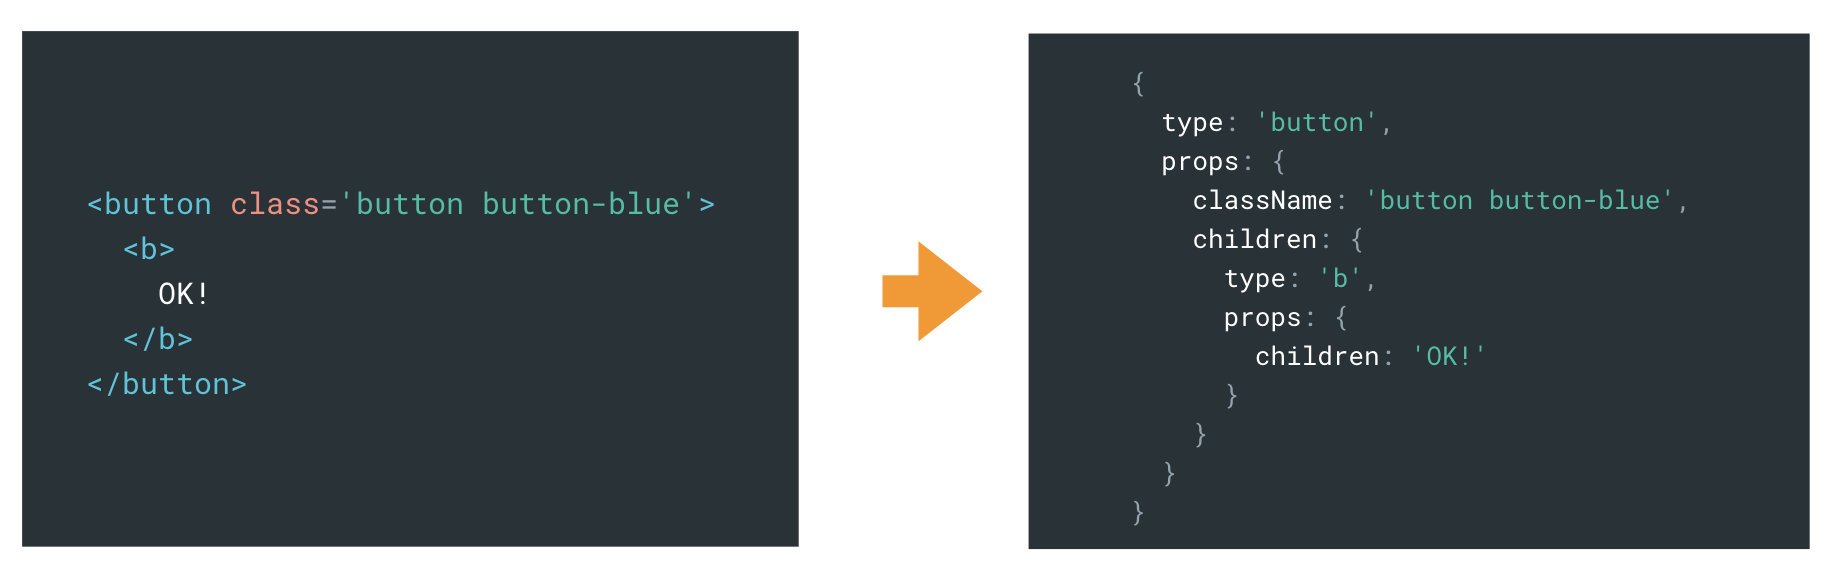
Virtual DOM
Then the different DOMs are compared using reconciliation, a heuristic diff comparison algorithm. For more information about it, you can give a look to the React documentation.
Flutter instead builds an Element Tree as a representation of the UI but instead, it does not use a tree-diffing algorithm to find the differences but instead, for each element of the UI the children list are examined independently.
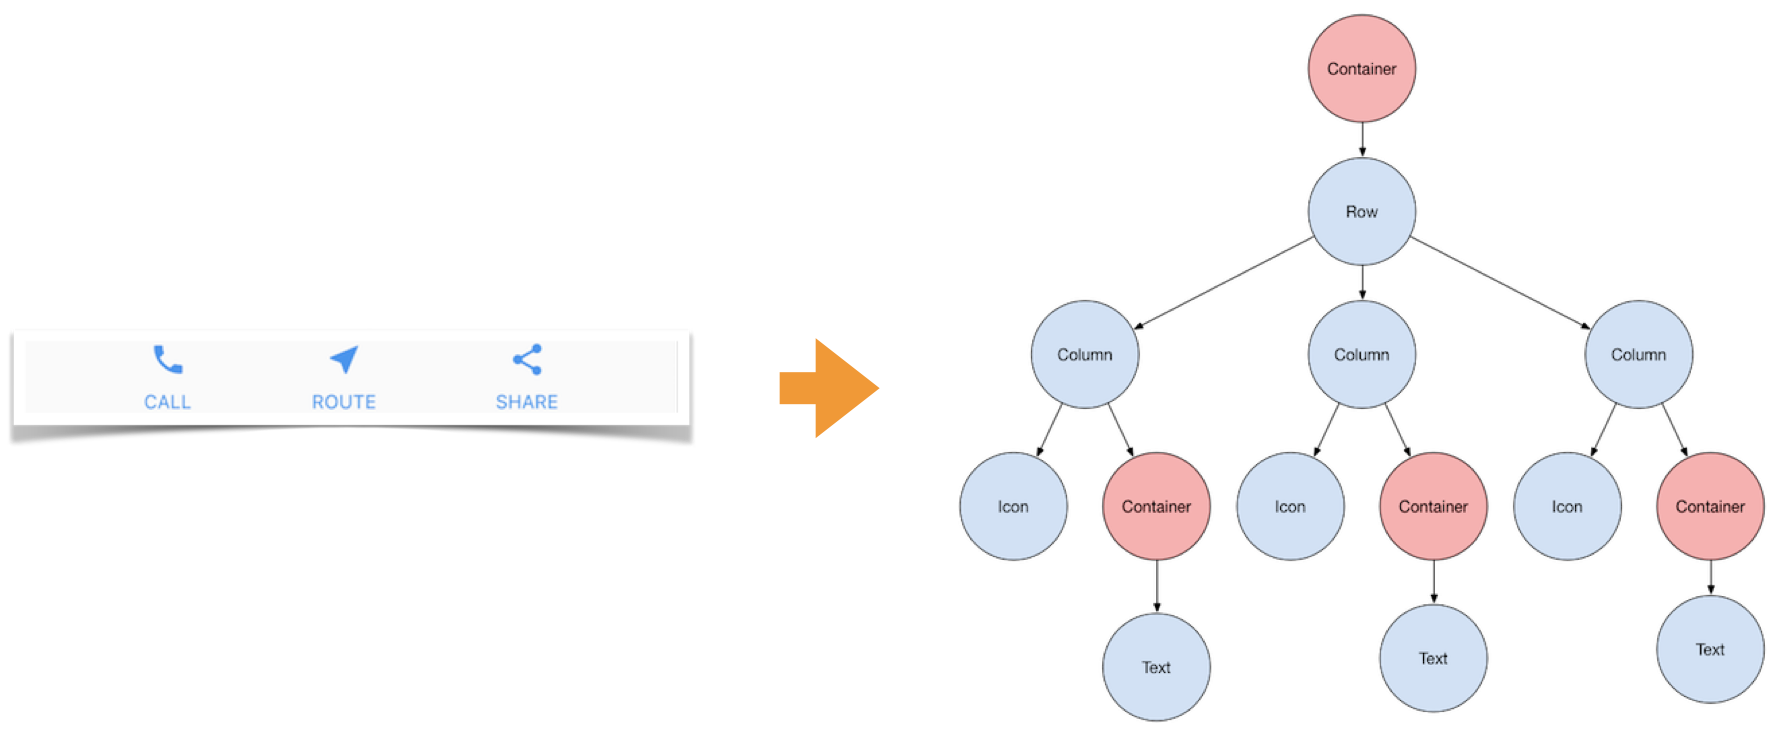
Flutter Element Tree
For more information about it, you can give a look to the Flutter documentation.
“Frankenstein” App
With Flutter and React Native, you can create a view, a screen or even an entire feature and then integrate it in an existing native application. This possibility can be really useful for example for very fast-evolving features or for an MVP feature that we are not so sure that it will be useful or even for a feature that will not be used so much. So it really depends on your situation but I can assure you that is not a crazy thing and maybe in the future, you could find yourself in this situation.
With React Native, you have to use in your native application a view that will act as a container of the RN app and then you load the javascript bundle that you have previously generated with a kilometric command.
react-native bundle \
--verbose \
--platform android \
--dev false
--entry-file index.js \
--bundle-output your-project/app/src/main/assets/index.android.bundle \
--assets-dest your-project/app/src/main/res \
--sourcemap-output utils/android.main.bundle.map
For more information, please visit the official documentation.
Also in Flutter, you have to define a container view in your native application but instead, you don’t need to write a kilometric command to generate bundle: you just add the Flutter project directly from Android Studio and that’s it! ( for iOs there is more work to do: you have to add a Flutter SDK hook to the CocoaPods and to Xcode build phase ).
Again, for more information, I suggest you read the official documentation
And we have reached the end of this journey through the internals of Flutter and React Native. I understand that I went through lots of things in this article but I think that it’s necessary to know a little bit about how things work if you choose and work with these frameworks. In fact, the way how these frameworks work can affect your product.
In the next (final) episode, we’ll wrap things up and I’ll help you resolve the dilemma!